

Bounce Settings
Use the Bounce Settings screen to configure how Interspire Email Marketer handles bounced emails.
Note: For manual bounce processing instructions, refer to Processing Bounced Emails.
Configuring Bounce Settings
To configure bounce settings:
- Click Settings in the toolbar, then select Bounce Settings.
- Choose the appropriate bounce account type from the dropdown menu:
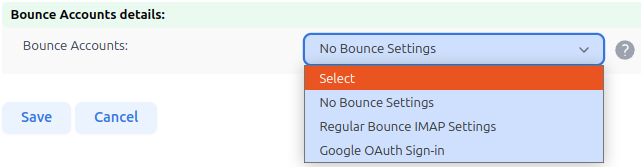
The available account types include:
- No Bounce Settings
- Regular Bounce IMAP Settings
- Google OAuth Sign-in
Regular Bounce IMAP/POP3 Settings
Select this option to specify global default settings for handling bounced emails via an IMAP/POP3 account.
Selecting Regular Bounce IMAP Settings displays:
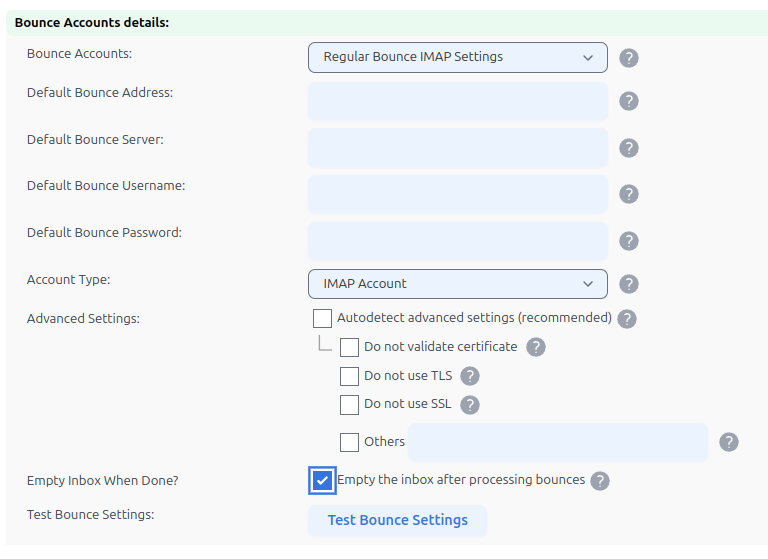
| Setting | Description |
|---|---|
| Default Bounce Address | Enter the default email address to receive bounced emails. |
| Default Bounce Server | Specify the server for handling bounces. If using a non-standard port, format as hostname:port. The port must be specified for TLS/SSL connections. For example, mail.example.com:993 for an TLS connection to an IMAP server and pop.example.com:995 for an TLS connection to a POP3 server. |
| Default Bounce Username | Enter the username for the bounce server account. |
| Default Bounce Password | Provide the corresponding password. |
| Account Type | Choose between POP3 (Post Office Protocol version 3) or IMAP (Internet Message Access Protocol). Note: v8.7.5 POP3 accounts require the PHP IMAP extension (ext-imap) to be installed on the server; IMAP accounts do not. If ext-imap is unavailable, use an IMAP account instead. |
| Advanced Settings | See below for additional configurations. |
| Empty Inbox When Done? | Enable to delete emails from the server after processing. |
| Test Bounce Settings | Connect to the bounce server to test the configuration. |
Advanced Settings
Select to access additional server connection configurations:
- Do not validate certificate: Choose if your server uses a self-signed SSL certificate.
- Do not use TLS: Choose if you wish to disable TLS (Transport Layer Security).
- Do not use SSL: Choose if you wish to disable SSL (Secure Sockets Layer).
- Others: Specify additional connection options as required.
Click Save to apply changes or Cancel to exit without saving.
Modernized Bounce Processing v8.7.5
Version 8.7.5 modernizes how bounce mailboxes are read, improving compatibility with a wider range of mail servers and adding support for PHP 8.4:
- IMAP accounts no longer require the PHP IMAP extension (
ext-imap) to be installed on the server. - POP3 accounts still require
ext-imap. If it is not installed, Test Bounce Settings and bounce processing return a clear message prompting you to installext-imapor switch the account to IMAP. - SSL-only mail servers that previously failed to connect now work, because a connectivity pre-check that could block them has been removed. Connection problems now surface as a clear error rather than a silent failure.
For server-side requirements, see Server Requirements.
Google OAuth Sign-in
Use Google OAuth Sign-in for simplified bounce email management with Google Gmail:

To set up:
- Click Google OAuth Sign-in.
- Fill in the following details:
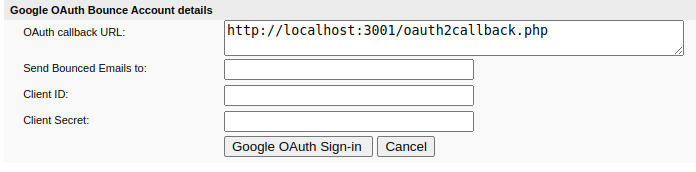
- OAuth callback URL: Use the provided callback URL.
- Send Bounced Emails to: Email address designated for receiving bounced emails.
- Client ID and Client Secret: Obtain these from your Google API credentials.
- Click Google OAuth Sign-in to authenticate.
For detailed setup instructions, see Setting Up Google OAuth to Access Gmail for Email Bounce Processing: A Step-by-Step Guide.
Note: The options and fields displayed depend on the selected bounce account type.