

Email Settings
Use the Email settings screen to view and manage global email settings relating to:
- Email size, rate and number.
- Resend attempts.
- The maximum size of images users may upload and use in campaigns.
- Email footers.
- Unsubscribe links.
- Attachments.
- Embedded images.
- Test mode (when in test mode, no emails are sent to contacts).
- Mail server details.
- Default bounced email settings.
Note: The fields in this screen control global settings. To configure user‐specific email settings, use the User accounts > Email settings screen.
Take the following steps to configure global email settings:
- Click Settings in the toolbar, then click Email settings. Configure your settings.
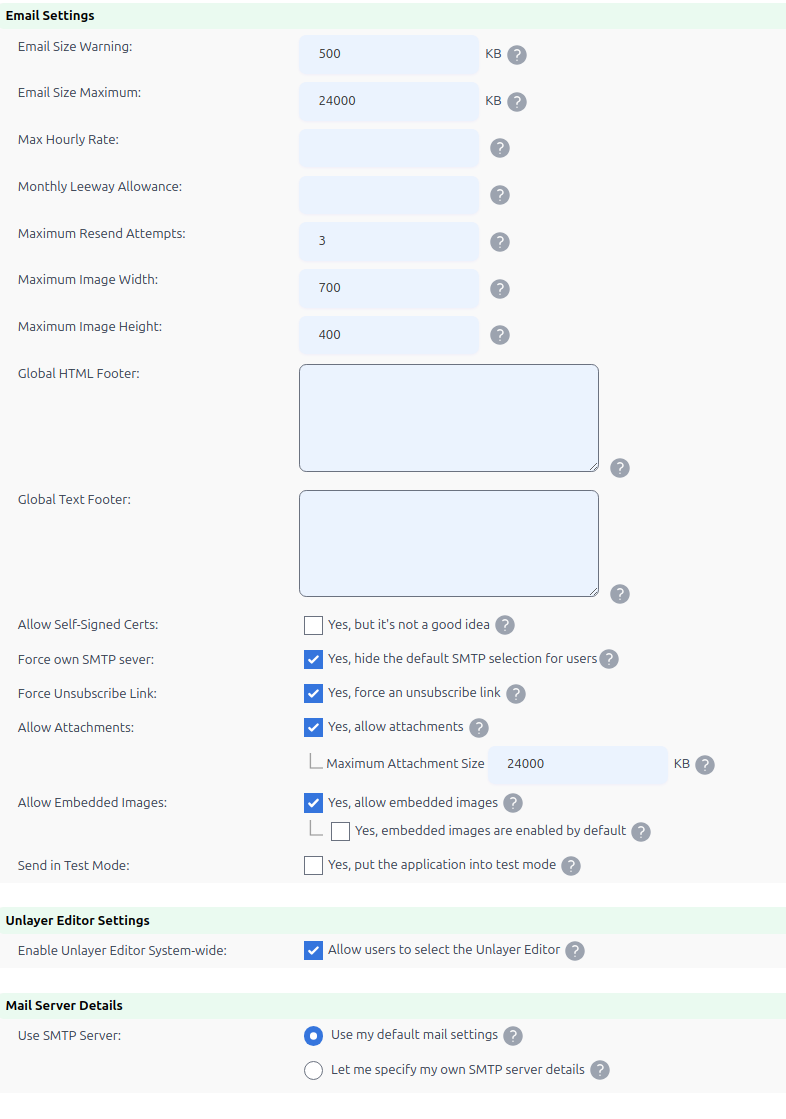
Settings: Email Settings
Settings: Email Settings
| Email Settings | |
| Email Size Warning | You can have Interspire Email Marketer display a warning message if a user tries to send an email or autoresponder over a certain size. Enter the size (in kilobytes) above which this warning should display. Note: Enter zero (“0”) to not sand email size warnings. |
| Email Size Maximum | Enter the maximum size (in kilobytes) for an email campaign or autoresponder. Interspire Email Marketer won’t send an email campaign larger than this. Note: Enter zero (“0”) to allow email campaigns and autoresponders of any size. |
| Max Hourly Rate | Enter the maximum number of emails a user may send, per campaign, per hour. Note: If users have multiple campaigns, they may send up to this number of emails per campaign per hour. Note: Enter zero (“0”) to allow any number of emails per campaign per hour. |
| Monthly Leeway Allowance | If you want to allow users to go over their monthly email limit, enter the number of “grace” emails here. Note: Enter zero (“0”) to allow no “grace” emails. |
| Maximum Resend Attempts | Enter the number of times Interspire Email Marketer allows users to re‐send email campaigns. |
| Maximum Image Width | Use this, in conjunction with the Maximum image height field, to limit the size of images users may upload to the Interspire Email Marketer server. Enter the maximum image width (x‐axis) in pixels. |
| Maximum Image Height | Use this, in conjunction with the Maximum image width field, to limit the size of images users may upload to the Interspire Email Marketer server. Enter the maximum image height (y‐axis) in pixels. |
| Global HTML Footer | If you want to add information to every HTML email, enter the information here. Note: If you also set a user‐specific HTML footer (see User Settings), the global footer displays after the user‐specific footer. |
| Global Text Footer | If you want to add information to every plain‐text email, enter the information here. Note: If you also set a user‐specific text footer (see User Settings), the global footer displays after the user‐specific footer. |
| Allow Self-Signed Certs | Selecting this option is dangerous and is not advisable. Ignoring the certificate checks comes close to using plain communication. |
| Force use own SMTP Server | Select this to restrict users in using the default SMTP server and forcing them to select and configure their own. |
| Force Unsubscribe Link | Select this to ensure that all emails and autoresponders sent by users include an unsubscribe link (the %%unsubscribelink%% variable). Deselect this to allow users to send emails and autoresponders without unsubscribe links. |
| Allow Attachments | Select this to allow users to attach files to their emails and autoresponders. Deselect this to forbid users from attaching files. |
| Maximum Attachment Size | Enter the largest size, in kilobytes, allowed per attachment (1 MB is 1,024 KB). This is a per-file limit, not a total for the email, so a campaign can still exceed it in aggregate — use Email Size Maximum above to cap the whole message. |
| Allow Embedded Images | Select this to allow users to embed images in their emails and autoresponders. Deselect this to forbid users from embedding images. |
| Default Embedded Images | Select this to have embedded images switched on by default when a user sends a campaign or creates a new autoresponder. Deselect it to have them default to off. This only sets the starting position — users can still change it per campaign, provided Allow Embedded Images is enabled. |
| Send in Test Mode | Select this to activate test mode. In test mode, emails are not sent. This allows users to test Interspire Email Marketer without the danger of sending emails to contact lists. Deselect this to deactivate test mode. |
| Enable Unlayer Editor System-wide | Select this to allow the Unlayer editor to be selected by the users. Note: The Unlayer editor is remotely loaded from Unlayer’s servers. The assets such as images will be stored on Unlayer’s servers and will not be stored on Interspire Email Marketer’s server. |
| Mail Server Details | Use SMTP Server Use the fields in this section to configure global SMTP settings. - Select Use my default mail settings to use the default settings configured on Interspire Email Marketer’s server. - Select Let me specify my own SMTP server details if you have another SMTP server you want to use. |
Click Save to save your changes. Alternatively, click Cancel to return to the Home screen without saving any changes.
Email Tracking Defaults v8.8.0
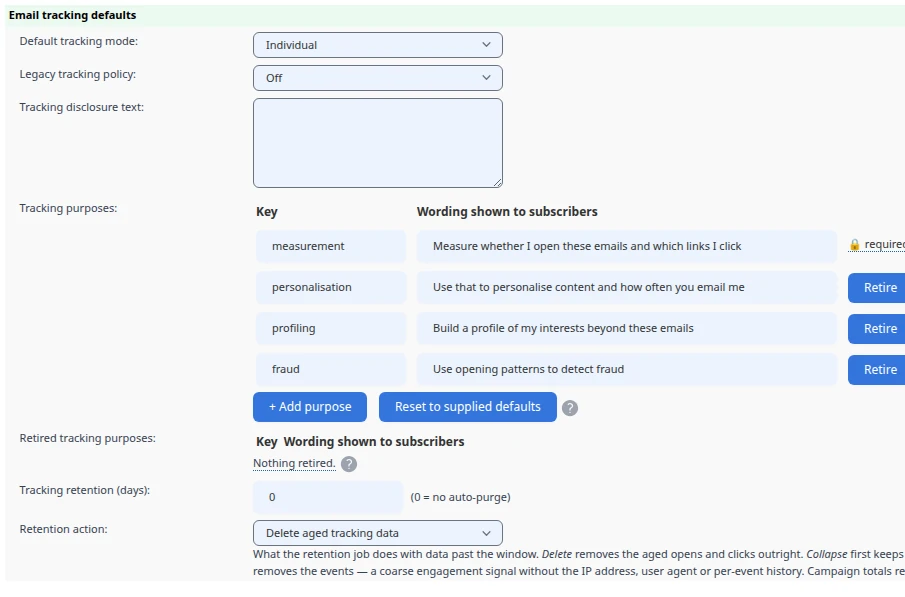
Version 8.8.0 replaces the old pair of open/click tracking checkboxes with a tracking mode chosen per campaign. The Email tracking defaults section of this screen sets the starting point every new list and campaign inherits.
| Setting | Description |
|---|---|
| Default tracking mode | The account-wide default. One of Off, Minimal — last-open date only, Aggregate (anonymous), Individual — consent required, or Individual. After upgrading this is set to Individual, which is how earlier versions behaved. |
| Legacy tracking policy | How to treat contacts who joined before you started asking about tracking. Off means do not track them. Transitional means keep tracking them, with every message carrying a notice and a one-click link to stop. |
| Tracking disclosure text | The wording shown to subscribers on your forms and preference page. This is your privacy notice, in your words — what ships is a neutral placeholder, not legal wording. |
| Tracking purposes | What you are asking permission for. Edited as one row per purpose — a Key and the Wording shown to subscribers — with Add, Retire, Restore and Reset controls. Each purpose becomes a separate control subscribers can grant or withdraw individually. |
| Retired tracking purposes | Wording for purposes you no longer ask about, kept so older consent records stay readable. |
| Tracking retention (days) | 0 keeps tracking data indefinitely. A positive number lets the scheduled cleanup task act on opens and clicks older than that. |
| Retention action | What happens to data past the window. Delete discards it. Collapse keeps each contact’s most recent last-opened date and discards the rest. |
These are the account-wide defaults. Individual users can override the default mode and the legacy policy for the lists they own (Users → Edit → Email settings), and individual lists can override the mode, the legacy policy and the disclosure text. A list resolves its default as list → list owner → account.
For what each mode does, how consent is captured and withdrawn, how the purposes editor works, and how reports change, see Email Tracking Modes and Consent.
Bot Detection Settings v8.7.5
Version 8.7.5 adds bot detection settings to the Email Settings screen. These settings control how aggressively the system identifies automated email scanner activity in your open and click statistics.
The bot detection settings are located at the bottom of the Email Settings page:
| Setting | Default | Description |
|---|---|---|
| Bot Click Duration | 30 seconds | The time window used to detect timing-based bot activity. Opens or clicks that occur within this many seconds of email delivery are flagged as potential bot activity. Set to 0 to disable timing-based detection. |
| Bot IP Rate Subscribers | 50 | The subscriber count threshold for IP-based rate detection. If a single IP address generates activity from more subscribers than this threshold within the time window, the activity is flagged as bot-generated. |
| Bot IP Rate Seconds | 60 seconds | The time window for IP rate detection. Works together with the subscriber threshold above. |
In addition to the real-time detection that happens when opens and clicks are recorded, a background cron job periodically runs to apply additional detection rules to historical data. This ensures that bot activity is identified even when it can only be detected by looking at patterns across multiple events. See Cron Jobs for more information.
Global SMTP Settings
These settings will be the default settings for all users. If you want to configure user-specific SMTP settings, see User Settings. Additionally, when testing SMTP settings, the test email will be sent from the global SMTP server using the Administrator’s email address.
Take the following steps to configure global SMTP settings:
- Click Settings in the toolbar, then click the Email settings tab.
- Set up the global email server settings in the Mail Server Details section:
- Select Use my default SMTP server to use the default server for Interspire Email Marketer.
- If you have a specific SMTP server details that you want to use, select Let me specify my own SMTP server details. The following screen displays.
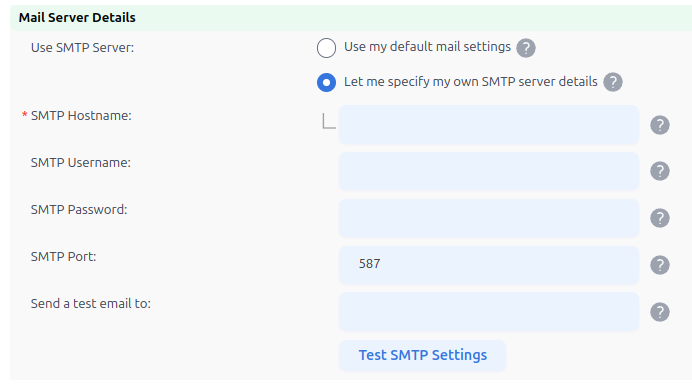
Email Settings: SMTP Server Details
- Specify the SMTP hostname (required).
- If your SMTP server requires a username and password for authentication, enter them in the SMTP username and SMTP password fields.
- If your SMTP server uses a non‐standard port number, enter it in the SMTP port field (the standard SMTP port number is 25 although nowadays it is more common to use port 587).
- To ensure that the SMTP settings are functioning correctly, enter an email address in the Test SMTP settings field and click Test SMTP settings to send an email to the specified address. The test email will be sent from the global SMTP server using the Administrator’s email address.
Click Save to save your changes. Alternatively, click Cancel to return to the Home screen without saving any changes.