Bounce Settings
Use the Bounce Settings screen to configure how Interspire Email Marketer handles bounced emails.
Note: For manual bounce processing instructions, refer to Processing Bounced Emails.
Configuring Bounce Settings
To configure bounce settings:
- Click Settings in the toolbar, then select Bounce Settings.
- Choose the appropriate bounce account type from the dropdown menu:
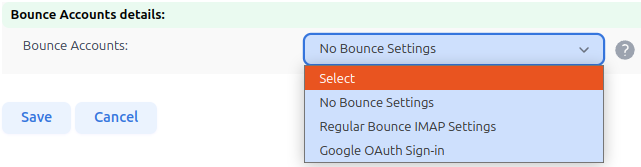
The available account types include:
- No Bounce Settings
- Regular Bounce IMAP Settings
- Google OAuth Sign-in
Regular Bounce IMAP/POP3 Settings
Select this option to specify global default settings for handling bounced emails via an IMAP/POP3 account.
Selecting Regular Bounce IMAP Settings displays:
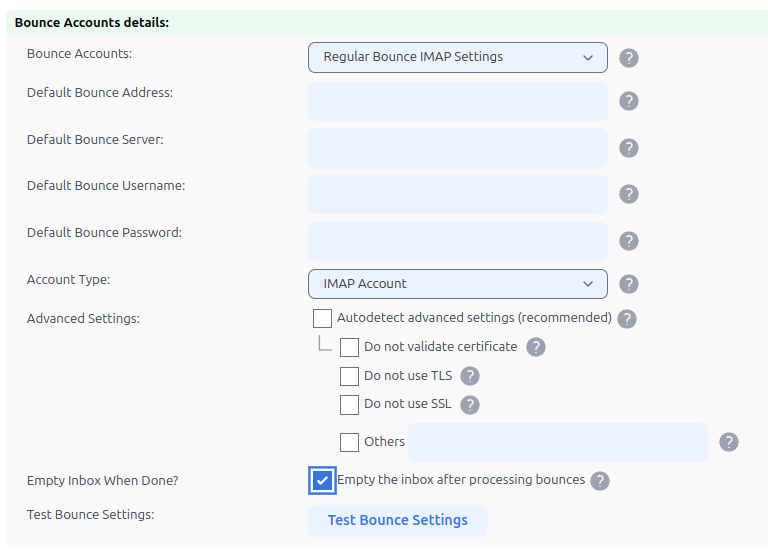
| Setting | Description |
|---|---|
| Default Bounce Address | Enter the default email address to receive bounced emails. |
| Default Bounce Server | Specify the server for handling bounces. If using a non-standard port, format as hostname:port. The port must be specified for TLS/SSL connections. For example, mail.example.com:993 for an TLS connection to an IMAP server and pop.example.com:995 for an TLS connection to a POP3 server. |
| Default Bounce Username | Enter the username for the bounce server account. |
| Default Bounce Password | Provide the corresponding password. |
| Account Type | Choose between POP3 (Post Office Protocol version 3) or IMAP (Internet Message Access Protocol). |
| Advanced Settings | See below for additional configurations. |
| Empty Inbox When Done? | Enable to delete emails from the server after processing. |
| Test Bounce Settings | Connect to the bounce server to test the configuration. |
Advanced Settings
Select to access additional server connection configurations:
- Do not validate certificate: Choose if your server uses a self-signed SSL certificate.
- Do not use TLS: Choose if you wish to disable TLS (Transport Layer Security).
- Do not use SSL: Choose if you wish to disable SSL (Secure Sockets Layer).
- Others: Specify additional connection options as required.
Click Save to apply changes or Cancel to exit without saving.
Google OAuth Sign-in
Use Google OAuth Sign-in for simplified bounce email management with Google Gmail:

To set up:
- Click Google OAuth Sign-in.
- Fill in the following details:
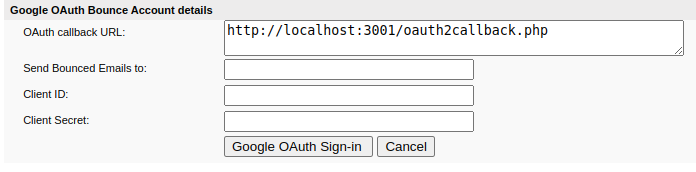
- OAuth callback URL: Use the provided callback URL.
- Send Bounced Emails to: Email address designated for receiving bounced emails.
- Client ID and Client Secret: Obtain these from your Google API credentials.
- Click Google OAuth Sign-in to authenticate.
For detailed setup instructions, see Setting Up Google OAuth to Access Gmail for Email Bounce Processing: A Step-by-Step Guide.
Note: The options and fields displayed depend on the selected bounce account type.