Cron Jobs
Introduction to Cron Jobs
Cron jobs are scheduled operations that run on your server to automate repetitive tasks. The term “cron” comes from “chronograph” and uses configuration files called crontabs to define when and how tasks should run. These jobs can execute command-line commands or scripts.
Interspire Email Marketer uses cron jobs to:
- Send scheduled email campaigns automatically.
- Process autoresponders at defined intervals.
- Handle bounced emails.
- Perform maintenance tasks.
- Trigger email sends based on events.
- Clean up unconfirmed or bounced subscribers.
- Run split test campaigns.
For Interspire Email Marketer to use cron, your server must support it. If you’re unsure whether cron is enabled on your hosting environment, contact your hosting provider.
You’ll need to complete two setup steps:
Configuring Cron Jobs in Interspire Email Marketer
To configure cron jobs within the application:
- Log in to Interspire Email Marketer.
- Click Settings in the toolbar, then choose Cron Settings.
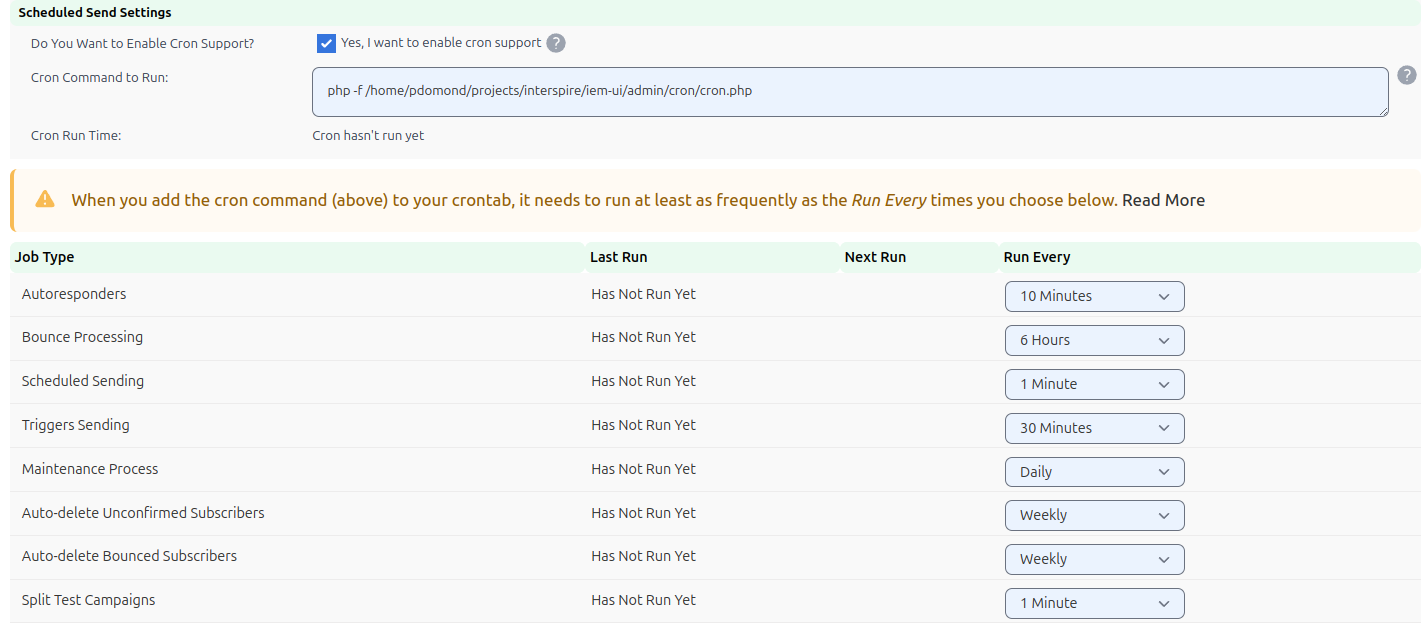
Settings: Cron Settings
-
Check Yes, I want to enable cron support to activate cron-based automation. If this option is unchecked, all other settings on this screen will be hidden.
(Note: Cron support is enabled by default.) -
Use the Run every dropdowns to set how often each cron task should run:
- Autoresponders – Send follow-up messages when contacts join your lists.
- Bounce processing – Identify and handle undeliverable emails.
- Scheduled sending – Dispatch email campaigns at scheduled times.
- Triggers sending – Send emails based on trigger rules.
- Maintenance process – Automatically remove import/export files older than the stall time (default is 4 hours).
- Auto-delete Unconfirmed Subscribers – Automatically remove unconfirmed contacts after a set period.
- Auto-delete Bounced Subscribers – Remove subscribers marked as bounced.
- Split test campaigns – Execute A/B tests of multiple email variations.
You can disable any job by selecting Disable from its dropdown.
-
The Last run and Next run columns show when each job was last executed and when it’s next scheduled to run.
-
Click Save to apply your changes, or Cancel to return to the Home screen without saving.
Cron Support on Your Server
Once you’ve configured the cron tasks inside Interspire Email Marketer, you’ll need to schedule the master cron job on your server:
- In the admin panel, go to Settings > Cron Settings.
- Copy the value shown in the Cron command to run field. This is the script your server will execute.
- Check which task in the Run every list has the most frequent interval. Your server’s cron job must run at least that often.
- Log in to your server or control panel and configure the crontab file to run the copied command.
For step-by-step guidance on editing the crontab from the command line, see the Cron Via Commands section.
Cron Via Commands
To set up cron via the command line interface, you can either use Telnet or your server’s control panel terminal. Start by entering the command to edit your crontab:
crontab -eNext, configure the cron job. Use the command you copied from Interspire Email Marketer’s Cron command to run field, preceded by five asterisks to define the schedule:
* * * * * /path/to/php -f /path/to/emailmarketer/admin/cron/cron.phpReplace /path/to/php and /path/to/emailmarketer with your actual server paths.
The five asterisks define how frequently the cron.php script runs. Each position represents a unit of time: minute, hour, day of month, month, and day of week.
You can use either numeric values or full names (e.g., march for the month or tuesday for the day), and these are not case-sensitive.
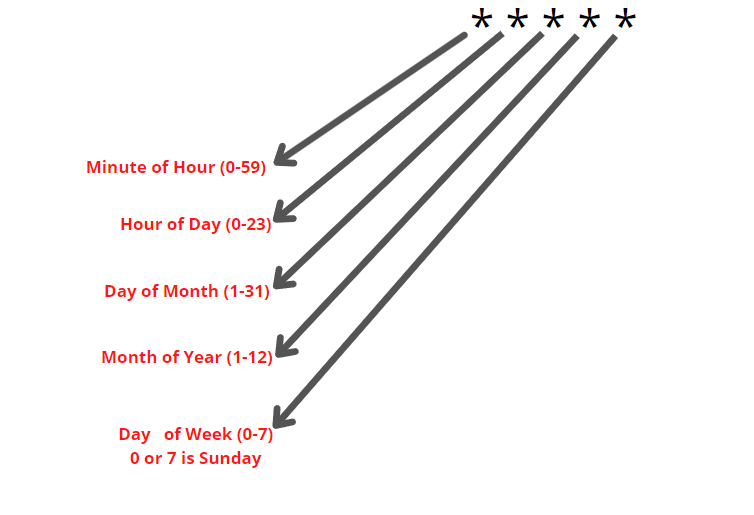 Cron Timing Configuration
Here’s how you can customize the timing:
- An asterisk (
*) is a wildcard. Using* * * * *runs the script every minute. - You can enter specific numbers (e.g.,
0 2 * * *to run daily at 2 AM). - Ranges (e.g.,
3-6) allow you to specify a span of values. - Step values (e.g.,
*/5) indicate intervals. For example, placing*/5in the Minute field runs the job every five minutes.
For most setups, running the cron every minute is recommended. This ensures that features like scheduled sending operate with minute-level precision. You can configure less frequent intervals for tasks like autoresponders or bounce processing directly within Interspire Email Marketer.
For more detailed information, visit: Setting Up Scheduled Sending Using Cron