Triggers
Triggers are event-based automation rules that perform actions when specific conditions are met. Unlike autoresponders which are time-based sequences, triggers respond to subscriber behavior, dates, or subscription events.
Prerequisites
Before creating triggers, ensure you have:
- Enabled cron jobs - Triggers require scheduled job processing to fire. See Cron Jobs for setup instructions.
- At least one contact list - Triggers operate on contacts within lists. See Contact Lists for creating lists.
- Email campaigns or autoresponders - For engagement-based triggers (opens, clicks), you need existing email campaigns or autoresponders to track.
- Custom date fields (optional) - For date field triggers like birthdays, set up custom fields in your contact lists before creating triggers.
Viewing and Managing Triggers
To view the event triggers already set up in Interspire Email Marketer, click Autoresponders in the navigation bar, then View triggers.
Viewing Triggers
| Create a trigger | Click this to set up a new trigger event. See Creating and Editing Triggers for information on the screen that displays. |
| Choose an action | Select one or more triggers’ checkboxes, choose an item from the list, and click Go to perform the action on the selected trigger (or triggers). - Select Delete selected trigger(s) to remove the selected trigger (or triggers) from Interspire Email Marketer. Deleted triggers cannot be retrieved. - Select Mark selected trigger(s) as active to enable the trigger (or triggers). - Select Mark selected trigger(s) as inactive to disable the trigger (or triggers). |
| Select a box belonging to a trigger before choosing an option from the Choose an action list. Select the box at the top of the column to select all triggers. | |
| Name | This displays the name that you assigned to this event trigger. This name does not display to the public. |
| Created | This displays the date on which you created the event trigger. |
| Triggered by | This displays information about the type of event that sets off the trigger. - Predefined date displays if you selected Based on a specific date when you created the event trigger. - Custom field displays if you selected Based on a contact’s date field when you created the event trigger. - Link clicked displays if you selected Based on a link being clicked when you created the event trigger. - Email campaign opened displays if you selected Based on a email campaign being opened when you created the event trigger. |
| When | This displays information about when the relevant action occurs. - Immediately after displays if you selected On or On the date when you created the event trigger. - [X] hours before displays if you selected Before [X] hours when you created the event trigger. Note: Even if you selected [X] days or [X] weeks when you created the event trigger, the relevant number of hours displays. - N/A displays if you selected an option other than those above when you created the event trigger. |
| Active | - A tick displays if the trigger is enabled. The relevant action is taken if the trigger event occurs. - A cross displays if the trigger is disabled. The relevant action is not taken if the trigger event occurs. |
| Action | - Click Edit to modify the trigger. The Edit trigger screen’s General settings tab displays (see Creating and Editing Triggers). - Click Copy to create a new trigger with the same properties as the original. The new trigger displays with Copy of prepended to its name. - Click Delete to remove the trigger from Interspire Email Marketer. Deleted triggers cannot be retrieved. |
Understanding Trigger Types
Interspire Email Marketer supports 9 different trigger types across three categories:
| Trigger Type | Category | When It Fires | Common Use Cases |
|---|---|---|---|
| Based on Contact’s Date Field | Date-based | On, before, or after a date stored in a contact’s custom field | Birthday campaigns, anniversary emails, renewal reminders |
| Based on a Specific Date | Date-based | On, before, or after a fixed calendar date | Holiday promotions, seasonal campaigns, event reminders |
| Based on a Specific Date and Time | Date-based | On, before, or after a fixed calendar date and time | Time-sensitive launches, webinar reminders, flash sales |
| Based on Email Campaign Opened | Email Engagement | When a contact opens a newsletter/campaign | Re-engagement sequences, follow-up messages, warm lead identification |
| Based on Link Clicked | Email Engagement | When a contact clicks a specific link in a campaign | Interest-based follow-ups, product-specific content, lead scoring |
| Based on Autoresponder Opened v8.7.3 | Email Engagement | When a contact opens an autoresponder email | Autoresponder sequence engagement tracking, open-based workflows |
| Based on Autoresponder Link Clicked v8.7.3 | Email Engagement | When a contact clicks a link in an autoresponder | Autoresponder interest tracking, behavior-based segmentation |
| Based on List Subscription v8.7.3 | Subscription | Immediately when a contact subscribes to a list | Instant welcome emails, immediate multi-list additions, subscription notifications |
| Based on Segment Subscription v8.7.3 | Subscription | When a contact is added to or matches a segment | Dynamic segment-based campaigns, qualification workflows, VIP targeting |
Creating and Editing Triggers
- To create a new event trigger, click Autoresponders in the navigation bar, then click View triggers. In the screen that displays, click the Create new trigger button.
- To edit an existing event trigger, click Autoresponders in the navigation bar, then click View triggers. In the screen that displays, click the existing trigger’s Edit link.
General Settings
| Name your trigger | Enter a descriptive name for this event trigger. This name displays only in the configuration interface, and not to your contacts. |
| Activate this trigger | Select the type of event that should set off this trigger, and configure the additional fields that display. See Trigger Activation Options for information on configuring this field. |
| Trigger the actions | Once you have selected an option in the Activate this trigger field, use this field to configure when the action should take place, in relation to the trigger event. The fields that display depend on the option you selected in the Activate this trigger field. - If you selected Based on a contact’s date or Based on a specific date, the following fields display: Date-Based Trigger Options In the first field: Select On to perform the action at the relevant time. Select Before to perform the action before the relevant time. In the additional fields that display, enter the required number of Hours,Days or Weeks before the time. Select After to perform the action after the relevant time. In the additional fields that display, enter the required number of Hours, Days or Weeks after the time. In the second field: Select The date to perform the action at the relevant time, and at no other time. Select The next anniversary of the date to perform the action at the next month and day (ignoring the year), and at no other time. Select Every anniversary of the date at the specified month and day, every year. - If you selected Based on a link being clicked or Based on a email campaign being opened, one of the following fields display: Email-Based Trigger Options Select When to perform the action at the moment the contact clicks the link or opens the email. Select After to perform the action at the moment the contact clicks the link or opens the email. In the additional fields that display, enter the required number of Hours, Days or Weeks after the event. |
| When triggered | Use this field to specify what should happen when the trigger is set off: Note: You can select multiple options in this field - If you want to send an email to the contact when the trigger is set off, select Send an email campaign. When Triggered: Send Email Campaign The list that displays contains all the email campaigns currently configured in Interspire Email Marketer. Select the required campaign from the list. Click Preview to open the selected email campaign in a new browser window. Note: When you select this option, the Sending options tab appears. Remember to configure this tab before you save the trigger (see The Sending Options Tab). - If you want to add contacts to another contact list when the trigger is set off, select Add the contact to an additional contact list. 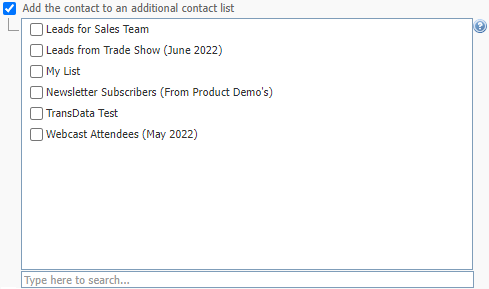 When Triggered: Add the Contact to an Additional Contact List Select the contact list (or lists) from the field that displays. - If you want to delete the contact from the original contact list, select Remove the contact from the contact list that they are in. Note: If you do not additionally select Add the contact to an additional contact list, the contact’s details cannot be retrieved. |
| Is trigger active? | Select this option to enable the trigger. When the event occurs, the trigger is set off. Deselect this option to disable the trigger. When the event occurs, the trigger is not set off. |
| Save | Click this to save your changes in this screen and return to the View triggers screen. |
| Cancel | Click this to return to the View triggers screen without saving your changes. |
Trigger Activation Options
This section describes the options available in the Create a new Trigger screen’s Activate this trigger field. Trigger types are organized into three categories:
Based on Contact’s Date Field
- Select Based on a contacts date field to set off the trigger based on a custom date field (for example, “Birth Date”).
- In the first list that displays, select the contact list to which you want to associate this trigger. In the second list, select the custom date field on which you want to base this trigger.
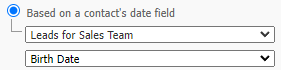
Activate Trigger Based on Contact’s Date Field
Note: To use this option, the contact list that you select must have at least one custom date field defined (for example “Birth Date”). For more information on setting up custom date fields and associating them with contact lists, see Creating and Editing Custom Fields and Date Field.
Note: When you select this option, you may apply the trigger to only a single contact list.
Based on a Specific Date
- Select Based on a specific date to set off the trigger based on the date that you specify.
- First, click the calendar icon that displays and select the date on which you want to base this trigger. Next, select the contact list (or lists) to which this trigger should apply from the Assign trigger list.
![]()
Activate Trigger Based on Specific Date
Note: When you select this option, you may apply the trigger to multiple contact lists.
Based on a Specific Date and Time
- Select Based on a specific date Time to set off the trigger based on the date and time that you specify.
- Use the drop-down menus to select the date and time you want to use for this trigger.
![]()
Activate Trigger Based on Specific Date and Time
Note: When you select this option, you may apply the trigger to multiple contact lists.
Based on a Link Being Clicked
- Select Based on a link being clicked to set off the trigger based on when a contact clicks a link in an email campaign (newsletter). In the first list that displays, select the campaign that contains the link. The second list contains the target URLs of all the links in the campaign you select. Select the required target URL.
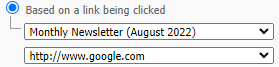
Activate Trigger Based on Link Being Clicked
Note: When you use this option, the email campaign that you select must contain at least one link.
Key Difference: This trigger tracks clicks in email campaigns (newsletters) only. For autoresponder link clicks, use “Based on an Autoresponder Link Clicked” instead.
Based on an Email Campaign Being Opened
- Select Based on an email campaign being opened to set off the trigger based on when a contact opens an email campaign (newsletter).
- The list that displays contains all the email campaigns currently configured in Interspire Email Marketer. Select the required campaign.
![]()
Activate Trigger Based on Email Being Opened
Note: When you select this option, the trigger applies to all contact lists.
Key Difference: This trigger tracks opens for email campaigns (newsletters) only. For autoresponder opens, use “Based on an Autoresponder Being Opened” instead.
Based on an Autoresponder Being Opened v8.7.3
- Select Based on an autoresponder being opened to set off the trigger based on when a contact opens an autoresponder email.
- In the first list that displays, select the contact list that contains the autoresponder. In the second list, select the specific autoresponder you want to track.
When to use this trigger:
- Track engagement with autoresponder sequences specifically
- Send follow-up emails when autoresponders are read
- Move engaged contacts to different lists (e.g., warm leads)
- Differentiate between campaign and autoresponder engagement
Note: This trigger tracks autoresponder emails only, not standard email campaigns. The autoresponder must have tracking enabled.
Based on an Autoresponder Link Clicked v8.7.3
- Select Based on an autoresponder link clicked to set off the trigger based on when a contact clicks a specific link in an autoresponder email.
- In the first list that displays, select the contact list that contains the autoresponder. In the second list, select the specific autoresponder. In the third list, select the target URL you want to track.
When to use this trigger:
- Track specific interest areas from autoresponder sequences
- Send targeted follow-ups based on clicked topics in autoresponder series
- Segment contacts based on autoresponder engagement behavior
- Build lead scoring workflows based on autoresponder interactions
Note: The autoresponder you select must contain at least one link and have link tracking enabled.
Based on List Subscription v8.7.3
- Select Based on list subscribe to set off the trigger immediately when a contact subscribes to a contact list.
- Select the contact list (or lists) from the field that displays.
When to use this trigger:
- Send immediate welcome emails (different from time-delayed autoresponders)
- Add subscribers to multiple lists simultaneously upon first subscription
- Notify list owner immediately when someone subscribes
- Trigger instant workflows upon subscription
Key differences from autoresponders:
- Timing: Fires immediately vs. time-delayed autoresponder sequences
- Flexibility: Can perform multiple actions (send email, add to lists, notify owner) vs. email-only
- Use case: One-time immediate actions vs. sequential email series
Note: This trigger fires once per subscription event. It will fire again if the contact unsubscribes and re-subscribes.
Based on Segment Subscription v8.7.3
- Select Based on segment subscribe to set off the trigger when a contact is added to or matches a segment’s criteria.
- Select the segment from the field that displays.
When to use this trigger:
- Target contacts who meet specific criteria dynamically
- Send emails to high-value segment members when they qualify
- Automate segment-based marketing workflows
- Track when contacts move into important behavioral segments
Key characteristics:
- Dynamic: Triggers when contact data changes to match segment rules
- Conditional: Based on segment criteria (custom fields, behavior, demographics)
- Targeted: Allows precise audience targeting based on multiple factors
Note: This trigger fires when a contact first meets the segment criteria. The segment must be created before setting up the trigger.
Trigger Actions
After selecting a trigger activation type, you must specify what actions to perform when the trigger fires. Interspire Email Marketer supports four action types that can be combined (multiple actions can run simultaneously).
Available Actions Overview
| Action | Purpose | Requires Additional Configuration |
|---|---|---|
| Send an Email Campaign | Deliver an email to the contact | Yes - Sending Options Tab |
| Add to Additional Contact List | Copy contact to one or more additional lists | No - Select lists inline |
| Remove from Contact List | Remove contact from current list | No - Automatic |
| Notify List Owner v8.7.3 | Send notification email to list owner | No - Uses owner’s email automatically |
Note: You can select multiple actions. For example, when a contact clicks a “Tell me more” link, you can simultaneously send them additional information, add them to a “Warm leads” list, remove them from “Cold leads”, and notify the sales team.
Send an Email Campaign
Send an email to the contact when the trigger fires.
![]()
When Triggered: Send Email Campaign
Configuration:
- Check Send an email campaign
- Select the email campaign from the dropdown list
- Click Preview to review the email in a new browser window
- Configure the Sending Options tab (see The Sending Options Tab)
When to use:
- Send personalized responses to engagement (link clicks, email opens)
- Deliver date-based content (birthday wishes, anniversary messages)
- Provide immediate follow-up information
- Send triggered drip campaign emails
Note: The Sending Options tab will appear when you select this action. You must configure sender details, tracking options, and other email settings before saving the trigger.
Add to Additional Contact List
Copy the contact to one or more additional lists while keeping them in the original list.
When Triggered: Add the Contact to an Additional Contact List
Configuration:
- Check Add the contact to an additional contact list
- Select one or more contact lists from the dropdown
When to use:
- Move engaged contacts to “Warm leads” list when they open emails
- Add interested contacts to product-specific lists when they click related links
- Build behavioral segments (e.g., “VIP customers” based on activity)
- Create multi-list memberships for cross-campaign targeting
Key characteristics:
- Contact remains in original list unless you also select “Remove from list”
- Contact receives autoresponders for newly added lists
- Duplicate prevention: Won’t create duplicate entries if already in target list
Remove from Contact List
Remove the contact from the list associated with the trigger event.
Configuration:
- Check Remove the contact from the contact list that they are in
When to use:
- Move contacts between lists (combine with “Add to additional list”)
- Clean lists based on engagement (remove inactive subscribers)
- Graduate contacts from one stage to another (Cold → Warm → Hot leads)
- Automatically unsubscribe contacts after specific actions
Important: If you remove a contact from a list without adding them to another list, their details cannot be retrieved. Use this action carefully and typically in combination with “Add to additional list”.
Best practices:
- Always confirm contacts should be removed before using this action
- Consider combining with “Add to additional list” to preserve contact data
- Use for list hygiene and stage-based marketing workflows
- Test thoroughly before activating on large lists
Notify List Owner v8.7.3
Send an email notification to the list owner when the trigger fires.
Configuration:
- Check Notify the owner of the list that the subscriber is on
- No additional configuration needed - uses list owner’s email automatically
When to use:
- Alert sales team when contacts click “Request Demo” or “Contact Sales” links
- Notify support team when high-value customers open support emails
- Track VIP subscriber engagement in real-time
- Monitor critical subscription or engagement events
- Get instant alerts for segment qualification (e.g., contact becomes high-value)
Notification includes:
- Subscriber’s email address
- Subscriber’s name (if available)
- Relevant custom field values
- Trigger name and activation event
- Contact list name
- Timestamp of trigger activation
Best practices:
- Use sparingly to avoid notification overload
- Combine with segments for targeted notifications (e.g., only high-value contacts)
- Reserve for high-priority actions that require immediate attention
- Consider creating dedicated notification email addresses for different teams
- Test with yourself first to verify notification content and timing
Technical notes:
- Notification email is sent independently of other actions
- If sending an email campaign fails, the notification still sends
- Owner email is pulled from list settings
- Executes asynchronously and won’t block other trigger actions
The Sending Options Tab
This tab displays only when you select the Send an email campaign option in the General settings tab.
Create a New Trigger: Sending Options
| Send from this name | This is the name of the person from which the triggered email will be sent. This displays your user’s full name (specified in your user account settings; see Creating and Editing User Accounts). If you want to use a different name, enter the new name in this field. |
| Send from this email address | This is the email address from which the triggered email will be sent. This displays your email address (specified in your user account settings). If you want to use a different name, enter the new name in this field. |
| Send reply emails to | This is the email address to which a contact’s reply email will be sent. This displays your email address (specified in your user account settings). If you want to use a different name, enter the new name in this field. |
| Send bounced emails to | Enter the address to which undeliverable emails are sent. |
| My “first name” custom field is | If you use a custom field to define a recipient’s first name, select it here. If you use a single field to define a recipient’s name, select it in this field. |
| My “last name” custom field is | If you use a custom field to define a recipient’s last name, select it here. If you use a single field to define a recipient’s name, leave this field blank. |
| Send your email as multipart | Select this to send both HTML and text elements of a multipart email campaign to recipients. This allows a recipient’s email client to choose the correct display method. Note: Use this option if you are unsure. Also, use this option if you don’t provide your recipients with the ability to choose HTML or text emails. |
| Track open rates for html emails | Select this to have Interspire Email Marketer track the proportion of HTML emails opened by their recipients. |
| Track links clicked in this email | Select this to have Interspire Email Marketer track the proportion of links in this email campaign that are clicked by the recipient. You can view the results of clicked links in the Statistics > Email campaign statistics. |
| Embed images as attachments | Select this to embed the images you send in HTML emails, rather than linking to them. This allows recipients to view the email campaign offline, but can increase the email size significantly. |
| Save | Click this to save your changes in this screen and return to the View triggers screen. |
| Cancel | Click this to return to the View triggers screen without saving your changes. |
Tips for Effective Trigger Management
Planning and Setup
- Map workflows first: Plan trigger logic on paper before creating in system
- Start simple: Begin with single-action triggers, add complexity as you gain confidence
- Test thoroughly: Create test contacts and verify triggers fire correctly
- Use descriptive names: Name triggers clearly (e.g., “Birthday - Send Discount - Annual” not “Trigger 1”)
Timing and Execution
- Consider time zones: Date-based triggers fire based on server time
- Cron job frequency matters: Triggers process when cron runs (typically every 5-15 minutes)
- Immediate vs. delayed: Use list subscribe triggers for instant action, autoresponders for sequences
- Anniversary options: Choose carefully between “The date” (one-time), “Next anniversary” (once), “Every anniversary” (recurring)
Action Combinations
- Multiple actions are powerful: Don’t hesitate to combine send + list management + notification
- Order doesn’t matter: All checked actions execute independently
- Test notifications separately: Notify owner can generate many emails - test carefully
- List removal requires care: Always ensure contacts are added elsewhere before removing
Monitoring and Optimization
- Check statistics regularly: View Trigger Statistics to monitor performance
- Inactive triggers: Disable triggers when testing or when campaigns aren’t ready
- Avoid duplicate triggers: Review existing triggers before creating similar ones
- Archive completed campaigns: Deactivate triggers for past events to keep list clean
Common Mistakes to Avoid
- Creating trigger without enabling cron jobs
- Removing contacts from lists without adding them elsewhere first
- Using “notify owner” on high-volume triggers (creates email overload)
- Forgetting to configure Sending Options tab when using “send email” action
- Setting up date triggers on lists without required custom fields
- Not testing triggers before activating on large lists
See Also
- Autoresponders - Time-based email sequences
- Trigger Statistics - Monitor trigger performance
- Autoresponder Statistics - Track autoresponder engagement
- Cron Jobs - Required for trigger execution
- Custom Fields - Create date fields for birthday/anniversary triggers
- Segments - Create dynamic contact groups for segment subscription triggers