

Custom Fields
Viewing and Managing Custom Fields
To view an existing custom fields you already created, click Contact lists in the navigation bar, then click View custom fields. This screen allows you to view and manage all the custom fields configured in Interspire Email Marketer.
You can create, edit and delete custom fields in this screen.
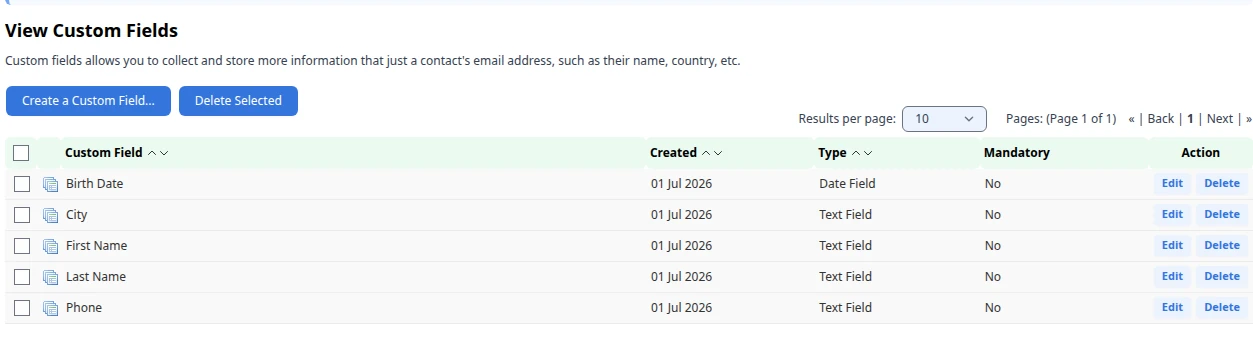
Viewing Custom Fields
| Create a custom field | Click this to define a new custom field. See Creating and Editing Custom Fields for information on the screens that display. |
| Delete selected | Select a box belonging to one or more fields, then click this button to delete the selected fields. |
 | Select a box belonging to a field before clicking the Delete selected button. Select the box at the top of the column to select all fields. |
| Custom field | This displays the name of the custom field. |
| Created | This displays the date on which you created the custom field. |
| Type | This displays the type of custom field. See Creating and Editing Custom Fields for information on the types of custom fields available. |
| Mandatory | This displays Yes if a contact must complete this field to be added to the contact list. |
| Action | - Click Edit to modify a custom field. See Creating and Editing Custom Fields for information on the screens that display. - Click Delete to remove a custom field from Interspire Email Marketer. The field cannot be retrieved. |
Creating and Editing Custom Fields
Take the following steps to create a custom field:
- Click Contact Lists in the navigation bar. Select View Custom Fields and click the Create a Custom Field button.
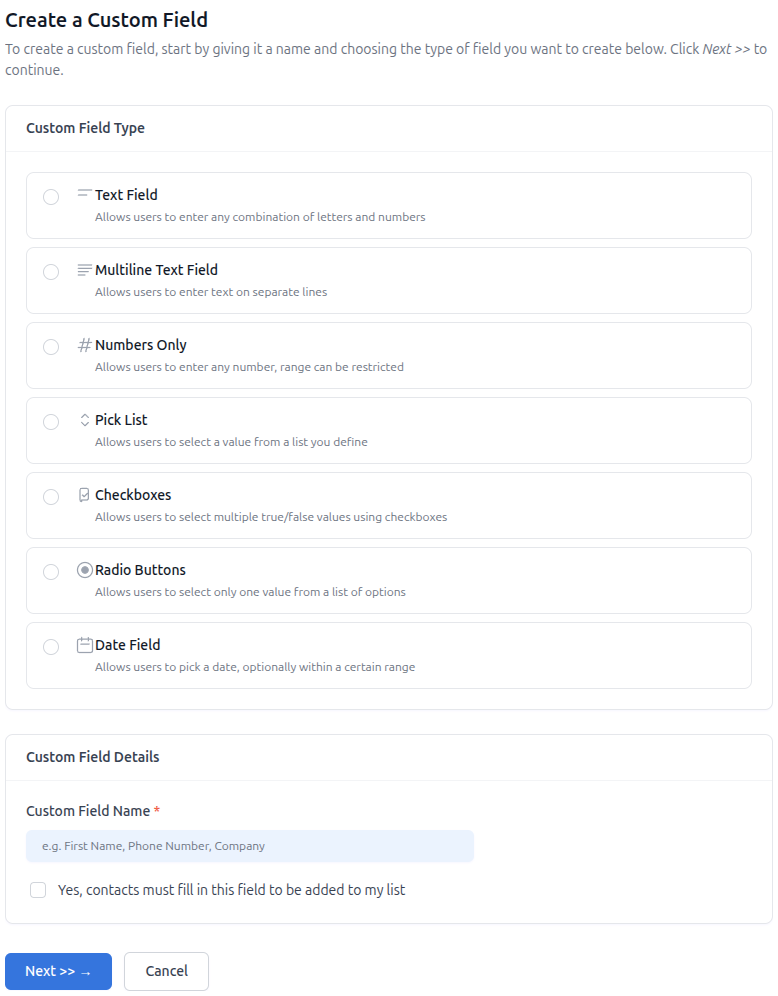
-
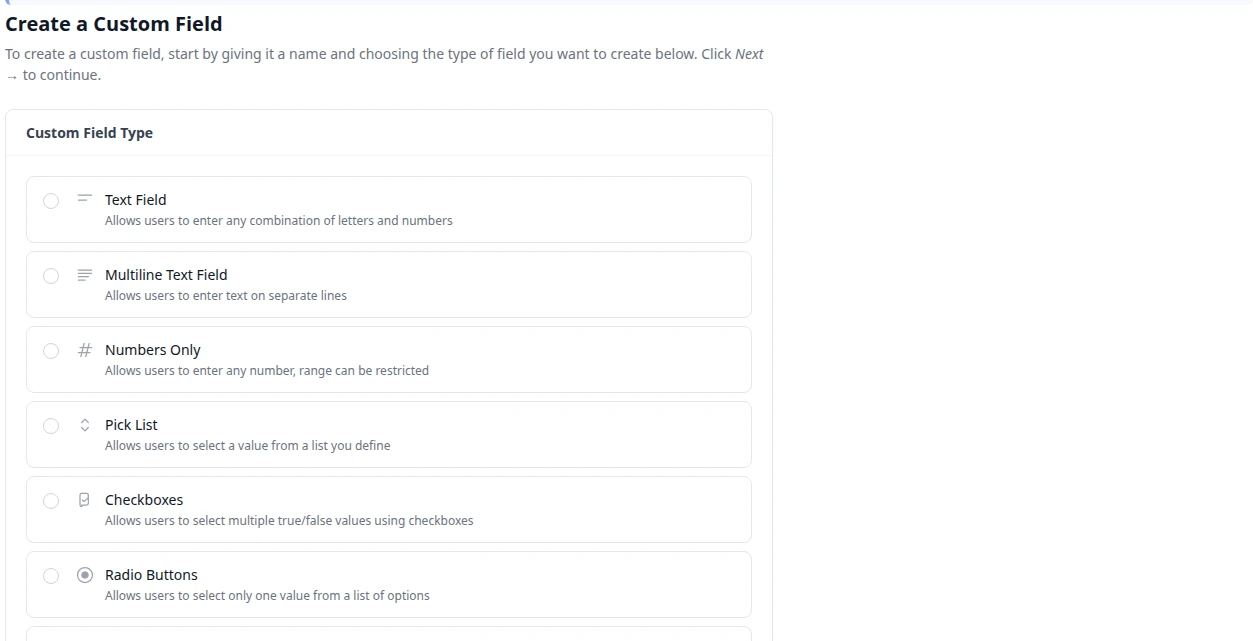
Select the Custom field type:
- Select Text field to create a field into which the user may enter a single line of text.
- Select Multiline text field to create a field into which the user may enter multiple lines of text.
- Select Numbers only to create a field into which the user may enter numerals only.
- Select Pick list to create a drop‐down list box from which the user may select an option.
- Select Checkboxes to create one or more check boxes from which the user may select multiple options.
- Select Radio buttons to create one or more radio buttons from which the user may select a single option.
- Select Date field to create a field from which the user may select a date. You can limit the years available for selection.
-
Enter the name for the field in the Custom field name field.
-
If you want Interspire Email Marketer to allow users to join a contact list only once they have completed this field, select the Is this field required? check box.
-
Click Next. The fields that display in the next screen depend upon the Custom field type you selected:
- If you selected Text field, see Text Field.
- If you selected Multiline text field, see Multiline Text Field.
- If you selected Numbers only, see Numbers Only Field.
- If you selected Pick list, see Pick List.
- If you selected Checkboxes, see Checkboxes.
- If you selected Radio buttons, see Radio Buttons.
- If you selected Date field, see Date Field.
-
When you have completed the fields in this screen, click Next.
- Select the contact list (or lists) in which you want to use this custom field.
- Click Save to finish configuring your custom field. The View custom fields screen displays (see Viewing and Managing Custom Fields).
Note: To insert a custom field in an email campaign, see Inserting Custom Fields
Text Field
This section describes how to configure the screen that displays when you select Text field in the Create a Custom Field: Type and Name screen (see Creating and Editing Custom Fields).
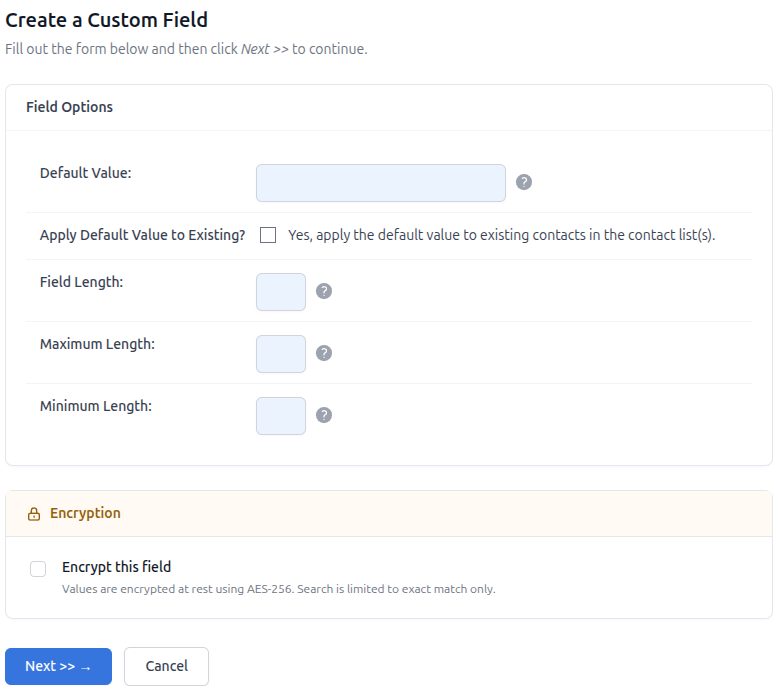
Configuring a Text Field
| Default value | Enter the value that displays by default in the field you are configuring. Note: If a contact fails to enter information in this field, this value displays in the contact’s contact list entry. |
| Apply default value to existing? | Tick the checkbox to apply the default value to existing contacts in the contact list(s). |
| Field length | Enter the length of the field as you want it to display on your website. |
| Maximum length | Enter the maximum number of characters a contact may enter in this field. |
| Minimum length | Enter the minimum number of characters a contact may enter in this field. |
| Next | Click this to save your changes in this screen and proceed with configuring your custom field. |
| Cancel | Click this to return to the View custom fields screen. See Viewing and Managing Custom Fields. |
Multiline Text Field
This section describes how to configure the screen that displays when you select Multiline text field in the Create a Custom Field: Type and Name screen (see Creating and Editing Custom Fields).
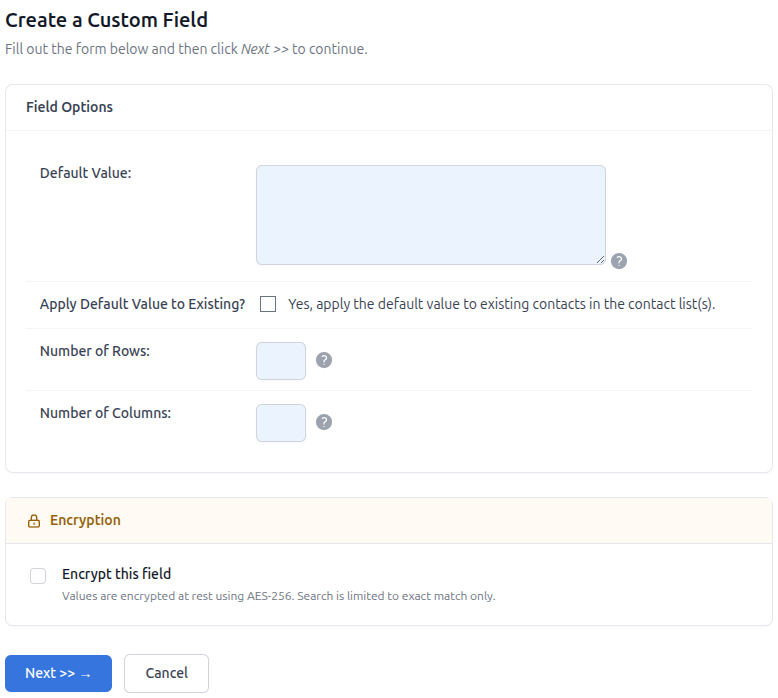
Configuring a Multiline Text Field
| Default value | Enter the value that displays by default in the field you are configuring. Note: If a contact fails to enter information in this field, this value displays in the contact’s contact list entry. |
| Apply Default Value to Existing? | Tick the checkbox to apply the default value to existing contacts in the contact list(s) |
| Number of rows | Enter the number of rows you want the text field to have. |
| Number of columns | Enter the number of columns you want the text field to have. |
| Next | Click this to save your changes in this screen and proceed with configuring your custom field. |
| Cancel | Click this to return to the View custom fields screen. See Viewing and Managing Custom Fields. |
Numbers Only Field
This section describes how to configure the screen that displays when you select Numbers only field in the Create a Custom Field: Type and Name screen (see Creating and Editing Custom Fields).
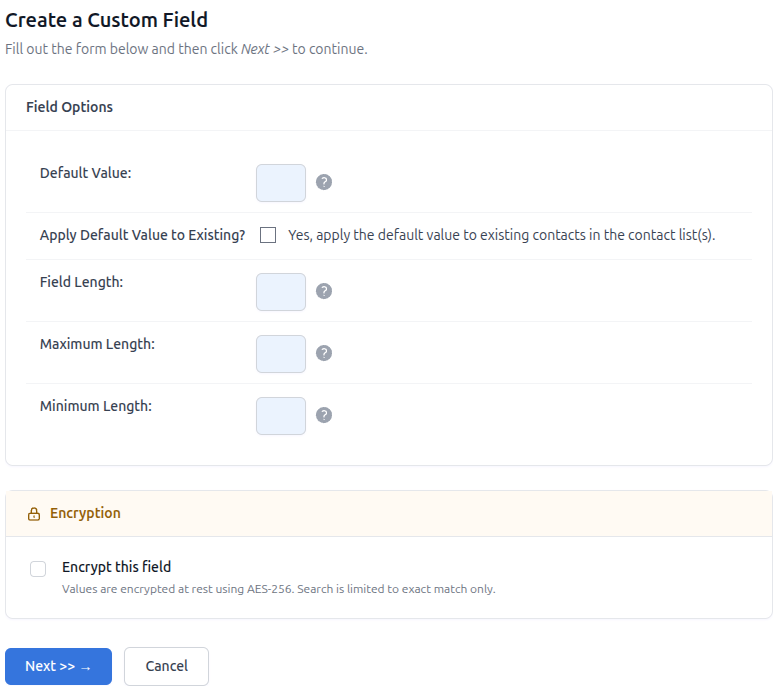
Configuring a Numbers Only Field
| Default value | Enter the value that displays by default in the field you are configuring. Note: If a contact fails to enter information in this field, this value displays in the contact’s contact list entry. |
| Apply value to existing? | Tick the checkbox to apply the default value to existing contacts in the contact list(s). |
| Field length | Enter the length of the field as you want it to display on your website. |
| Maximum length | Enter the maximum number of characters a contact may enter in this field. |
| Minimum length | Enter the minimum number of characters a contact may enter in this field. |
| Next | Click this to save your changes in this screen and proceed with configuring your custom field. |
| Cancel | Click this to return to the View custom fields screen. See Viewing and Managing Custom Fields. |
Pick List
This section describes how to configure the screen that displays when you select Pick List in the Create a Custom Field: Type and Name screen (see Creating and Editing Custom Fields).
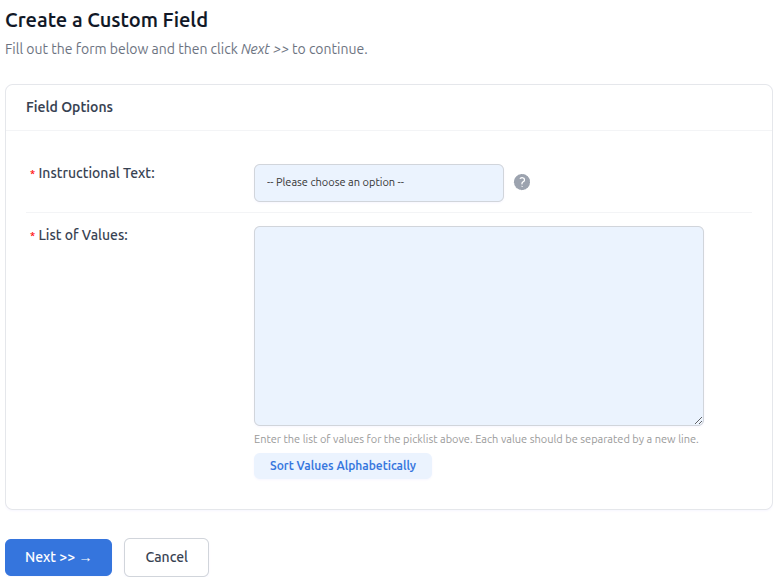
Configuring a Pick List
| Instructional text | Enter the text that displays to tell the user how to configure the field. |
| List of values | Enter all the options the user may pick from the list. |
| Sort values alphabetically | Click this to arrange the options from A to Z. |
| Next | Click this to save your changes in this screen and proceed with configuring your custom field. |
| Cancel | Click this to return to the View custom fields screen. See Viewing and Managing Custom Fields. |
Checkboxes
This section describes how to configure the screen that displays when you select Checkboxes in the Create a Custom Field: Type and Name screen (see Creating and Editing Custom Fields).
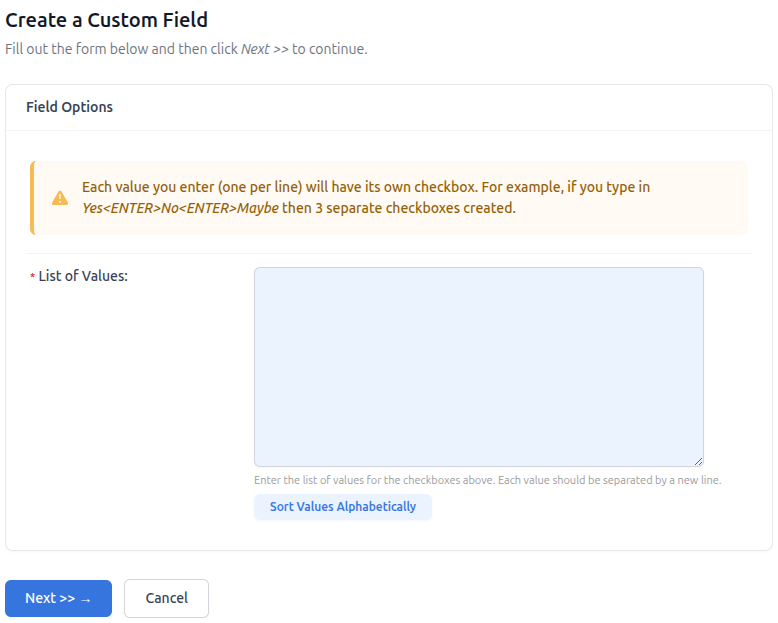
Configuring Checkboxes
| List of values | Enter all the options the user may select. Each option has a checkbox. |
| Sort values alphabetically | Click this to arrange the options from A to Z. |
| Next | Click this to save your changes in this screen and proceed with configuring your custom field. |
| Cancel | Click this to return to the View custom fields screen. See Viewing and Managing Custom Fields. |
Radio Buttons
This section describes how to configure the screen that displays when you select Radio Buttons in the Create a Custom Field: Type and Name screen (see Creating and Editing Custom Fields).
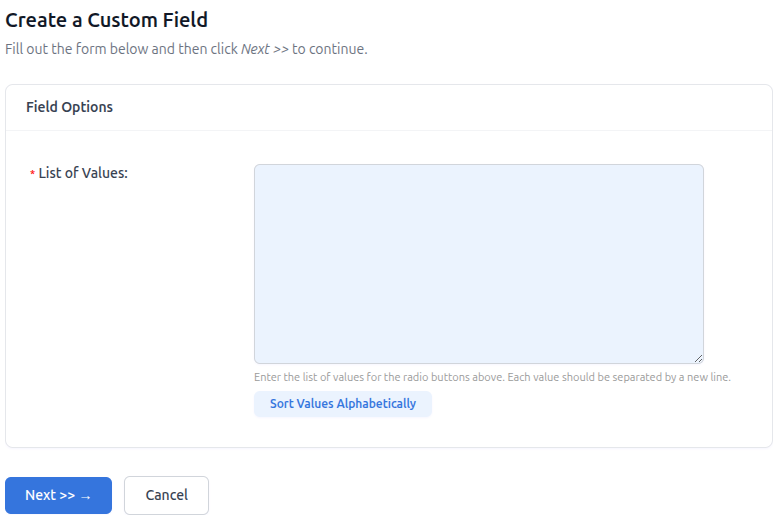
Configuring Radio Buttons
| List of values | Enter all the options the user may select (the user may select only one option). Each option has a radio button. |
| Sort values alphabetically | Click this to arrange the options from A to Z. |
| Next | Click this to save your changes in this screen and proceed with configuring your custom field. |
| Cancel | Click this to return to the View custom fields screen. See Viewing and Managing Custom Fields. |
Date Field
This section describes how to configure the screen that displays when you select Date Field in the Create a Custom Field: Type and Name screen (see Creating and Editing Custom Fields).
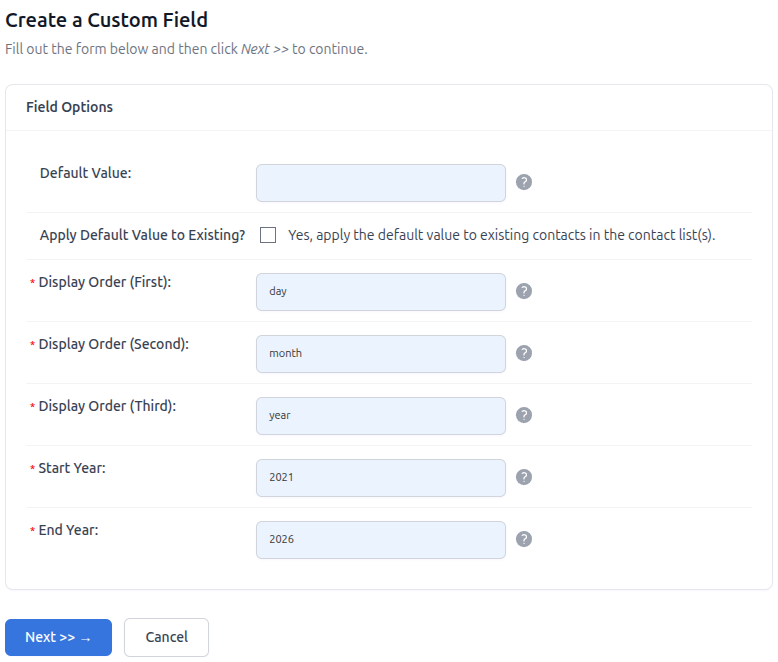
Configuring a Date Field
| Default value | Enter the date (or other text) that displays before the user selects anything. You may leave this blank if you do not want anything to display. |
| Apply value to existing? | Tick the checkbox to apply the default value to existing contacts in the contact list(s). |
| Display order (first/second/third) | Select the order in which you want the day, enter month and year to display in each of the display fields. |
| Start year | Enter the earliest year the user may select. |
| End year | Enter the latest year the user may select. |
| Next | Click this to save your changes in this screen and proceed with configuring your custom field. |
| Cancel | Click this to return to the View custom fields screen. See Viewing and Managing Custom Fields. |
Encrypted Custom Fields v8.7.5
Version 8.7.5 introduces field-level encryption for custom fields. When enabled, the data stored in an encrypted field is protected at rest, adding an extra layer of security for sensitive subscriber information such as account numbers, government IDs, or health data.
Enabling Encryption
You can enable encryption on Text, Multiline text, and Numbers only field types. Encryption is turned on when you create the field:
- Navigate to Contact Lists > View Custom Fields.
- Click Create a Custom Field.
- Complete Step 1 (type and name), then click Next.
- In Step 2, look for the Encryption panel. Check Encrypt this field to enable encryption.
When encryption is enabled, a second option appears: Allow in email personalization. This is off by default. If you turn it on, the decrypted value can appear in sent emails via merge tags. If left off, any merge tag referencing the encrypted field will be blocked from rendering in emails.
What Changes When a Field Is Encrypted
- Searching: Only exact-match searches are supported for encrypted fields. Partial or wildcard searches are not available.
- Segments: When building segment rules with an encrypted field, only the equals and does not equal operators are available. Other operators such as “contains” or “greater than” are automatically hidden.
- Exporting: Encrypted field data can only be exported by administrator accounts. Non-admin users will not see encrypted field values in their exports.
- Existing data: When you enable encryption on a field that already contains data, newly entered or edited values are encrypted immediately, but pre-existing values are not encrypted automatically. An administrator must run the backfill command-line tool once to encrypt the existing data (see Encrypting Existing Data below).
Encrypting Existing Data
Enabling encryption protects new and updated values right away, but data already stored in the field must be encrypted by a one-time backfill tool that an administrator runs from the command line on the server, once per field:
php tools/encrypt-customfield-backfill.php --field=IDReplace ID with the custom field’s ID. The field’s edit screen displays an encryption status badge — Plaintext, Encrypting…, or Encrypted — and, until encryption is complete, shows the exact command to run.
Notes:
- The tool is manual — it is not a scheduled cron job and does not run on its own.
SENDSTUDIO_ENC_KEYmust be configured before running it (see Credential Hardening).- It is safe to run more than once. A single-flight lock prevents two backfills (or a backfill and a save) from processing the same field at the same time, and rows already encrypted are skipped, so you can re-run it to finish an interrupted job.
- Until the backfill completes, exact-match search and segmentation on that field also include contacts whose values have not yet been encrypted. Run the tool promptly after enabling encryption on a populated field.
Best Practices
- Only encrypt fields that contain genuinely sensitive data. Encryption limits searching and segmentation capabilities.
- If you need to use an encrypted field value in email content (e.g., showing a member number in a welcome email), remember to enable Allow in email personalization on that field.