Forms Configuration
Basic Form Settings
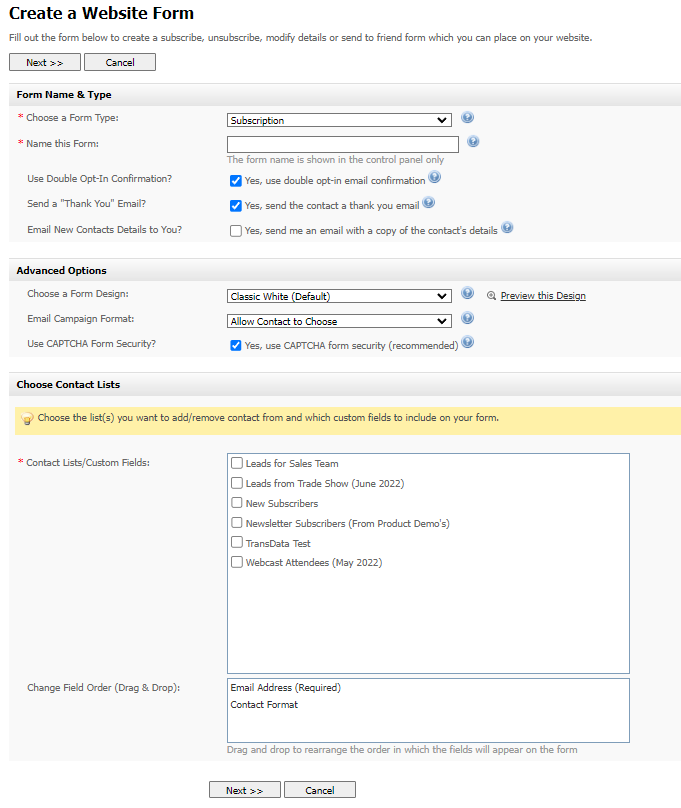
Use this screen to configure basic form settings such as form name and type, form design, and the contact list (or lists) with which the form is associated.
Note: The fields that display in this screen depend on the selection you made in the previous screen.
Configuring Basic Form Settings
Configuring Basic Form Settings
| Form name and type | |
| Choose a form type | Select the type of form you want to create. See Creating and Editing Forms. |
| Name this form | Enter a name for this form. This name identifies the form in Interspire Email Marketer. |
| Use double opt‐in confirmation | Select this if you want to send an email to contacts in which they must click a link to confirm that they want to subscribe to this list. Deselect this if you do not want to send such an email. |
| Send a “thank you” email | Select this if you want to send an email to contacts once they have successfully subscribed to the list. Deselect this if you do not want to send such an email. |
| Email new contact details to you | Select this if you want to receive the information that a contact enters by email. Deselect this if you do not want to receive such emails. Note: You can use this feature to turn a website form into a contact form; a contact can use it to send you information or queries directly. Usually, a contact who is already subscribed to a list and tries to subscribe again is directed to the error page (see Error Page). However, since a contact may want to send information to you on more than one occasion, contacts who complete a form with this feature configured directed to the thank you page, and not the error page. |
| Advanced options | |
| Choose form design | This controls the text and background design of the form. Select a design from the list. Click Preview this design to see how the form will look. Note: You need to configure a name for the form (in the Name this form field) and select a contact list and custom fields (in the Choose contact lists section) before you can preview the design. |
| Email campaign format | - Select Allow contact to choose to let contacts who sign up using this form choose whether to receive HTML or plain‐text emails. - Select HTML to send HTML emails to contacts who sign up using this form. - Select Text to send plain‐text emails to contacts who sign up using this form. |
| Change format | Select this to allow contacts to change the format of the emails they receive (from HTML to text, or from text to HTML). Deselect this if you do not want to allow contacts to change the format of the emails they receive. Note: This field displays only when you select Modify details in the Choose a form type field. |
| Use CAPTCHA form security | - Select No Captcha if you don’t want to use any Captcha - Select Yes, use PHP based CAPTCHA if you are placing your form on a different domain to the one used for the application your contacts will have issues using CAPTCHA on browsers such as Safarai, as they do not allow third party cookies to be set by default. - Select Yes, use JavaScript based CAPTCHA if the subscription is form is used on a different domain than where the IEM is installed and the user has deactivated 3rd party cookie support, the CAPTCHA check will fail. This is a client-side fallback solution. Note: CAPTCHA stands for “Completely Automated Public Turing test to tell Computers and Humans Apart”. A Turing test, named after mathematician and cryptographer Alan Turing, is a test intended to differentiate between an intelligent agent (such as a human), and an unintelligent agent (such as a piece of pre‐programmed software). Ideally, only intelligent agents can pass a Turing test. |
| Choose contact lists | |
| Contact lists/custom fields | Select the contact lists you want to associate with this form. - If you selected Subscription in the Choose a form type field, contacts are added to the list or lists you select. - If you selected Unsubscribe in the Choose a form type field, contacts are removed from the list or lists you select. - If you selected Modify details in the Choose a form type field, contacts from the lists you select may modify their details. If a contact list is associated with one or more custom fields, the fields display when you select the list. Select the fields you want to display in this form. If you choose multiple lists, List options displays. Use this to allow users to choose the list (or lists) to which they want to be added. Note: If a custom field is mandatory, make sure you include it in your form. |
| Change field order (drag & drop) | Use this section to change the order in which the fields display in your form. Simply click and drag a field to its new location. |
| Next | Click this to proceed to the next screen. The next screen depends on the option you selected in the Choose a form type field. |
| Cancel | Click this to return to the View website forms screen. |
Confirmation Page and Email
Use this screen to configure a page in which contacts must confirm they want to receive emails, and an email in which contacts must click a link to confirm they want to receive emails.
Note: The fields that display in this screen depend on the type of form you are creating. Not all fields display for all form types.
Designing a Confirmation Page and Email
| Form display options | |
| Let me customize what the page looks like | Select this option to design the confirmation page in the WYSIWYG editor. See HTML Editor for information. |
| Take the subscriber to an existing website address | Select this option to redirect the user to another page on the Internet.Enter the page’s full URL in the field that displays (for example, “https://www.example.com/somepage.html”) |
| Confirmation email options | |
| Send from this name | This is the name of the person from which the confirmation email will be sent. This displays the default “from” name for the contact list you selected. If you want to change this name, enter the new name in this field. |
| Send from this email address | This is the email address from which the confirmation email will be sent. This displays the default “from” email account for the contact list you selected. If you want to use a different email account, enter the new address in this field. |
| Send reply emails to | This is the name of the person from which the confirmation email will be sent. If a contact replies to your confirmation email, this is the address to which the reply is sent. This displays the default reply email address for this contact list. If you want to use a different address, enter the new address in this field. |
| Send bounced email to | This is the address to which undeliverable emails are sent. This displays the default bounced email address for this contact list. If you want to use a different address for handling bounced emails, enter the new address in this field. |
| Email subject | Enter the subject line for the confirmation email. |
| Confirmation email (HTML) | Design the HTML version of the confirmation email in this section. See HTML Editor for information. |
| Confirmation email (text) | Design the plain‐text version of the confirmation email in this section. See Text Editor for information. |
| Next | Click this to proceed to the next screen. The next screen depends on the option you selected in the Configuring basic form settings screen. |
| Cancel | Click this to return to the View website forms screen. |
Thank You Page and Email
Use this screen to configure a page informing contacts that the subscription (or unsubscription, modification, or forwarding) process is complete, and an email in which the same information is conveyed.
Note: The fields that display in this screen depend on the type of form you are creating. Not all fields display for all form types.
Note: If you are creating a Send to friend form, the Thanks email options do not display; the Configuring forwarded email headers section displays. See Forwarded Email Headers.
Designing a Thank You Page and Email
| Thank you page options | |
| Let me customize what the page looks like | Select this option to design the thank you page in the WYSIWYG editor that displays. See HTML Editor for information. |
| Take the subscriber to an existing website address | Select this option to redirect the user to another page on the Internet. Enter the page’s full URL in the field that displays (for example, “https://www.example.com/somepage.html”) |
| Thanks email options | |
| Send from this name | This is the name of the person from which the thank you email will be sent. This displays the default “from” name for the contact list you selected. If you want to change this name, enter the new name in this field. |
| Send from this email address | This is the email address from which the thank you email will be sent. This displays the default “from” email account for the contact list you selected. If you want to use a different email account, enter the new address in this field. |
| Send reply emails to | This is the name of the person from which the thank you email will be sent. If a contact replies to your thank you email, this is the address to which the reply is sent. This displays the default reply email address for this contact list. If you want to use a different address, enter the new address in this field. |
| Send bounced email to | This is the address to which undeliverable emails are sent. This displays the default bounced email address for this contact list. If you want to use a different address for handling bounced emails, enter the new address in this field. |
| Email subject | Enter the subject line for the thank you email. |
| Confirmation email (HTML) | Design the HTML version of the thank you email in this section. See HTML Editor for information. |
| Confirmation email (text) | Design the plain‐text version of the thank you email in this section. See Text Editor for information. |
| Next | Click this to proceed to the next screen. The next screen depends on the option you selected in the Configuring basic form settings screen. |
| Cancel | Click this to return to the View website forms screen. |
Forwarded Email Headers
When you select Send to friend in the Configuring basic form settings screen, use this screen to configure the headings that display above the forwarded HTML and text emails, identifying the sender by whom it was forwarded.
Note: This section displays beneath the Thank you page options. See Thank You Page and Email.
Designing Forwarded Email Headers
| Email header (HTML) | Design the HTML header in the WYSIWYG editor that displays. See HTML Editor for information. Note: The %%REFERRER_EMAIL%% variable places the email address of the contact who forwarded the email into the HTML header. |
| Email header (text) | Enter the text that displays in the plain‐text header. Note: The %%REFERRER_EMAIL%% variable places the email address of the contact who forwarded the email into the HTML header. |
| Next | Click this to proceed to the next screen. The next screen depends on the option you selected in the Configuring basic form settings screen. |
| Cancel | Click this to return to the View website forms screen. |
Error Page
Use this screen to configure a page that displays if there is an error in the subscription (or unsubscription, modification, or forwarding) process.
Designing an Error Page
| Let me customize what the page looks like | Select this option to design the error page in the WYSIWYG editor that displays. See HTML Editor for information. |
| Take the subscriber to an existing website address | Select this option to redirect the user to another page on the Internet. Enter the page’s full URL in the field that displays (for example, “https://www.example.com/somepage.html”) |
| Save | Click this to save the changes to your form and continue to the Add the form to your website screen. |
| Cancel | Click this to return to the View website forms screen. |