Security Settings
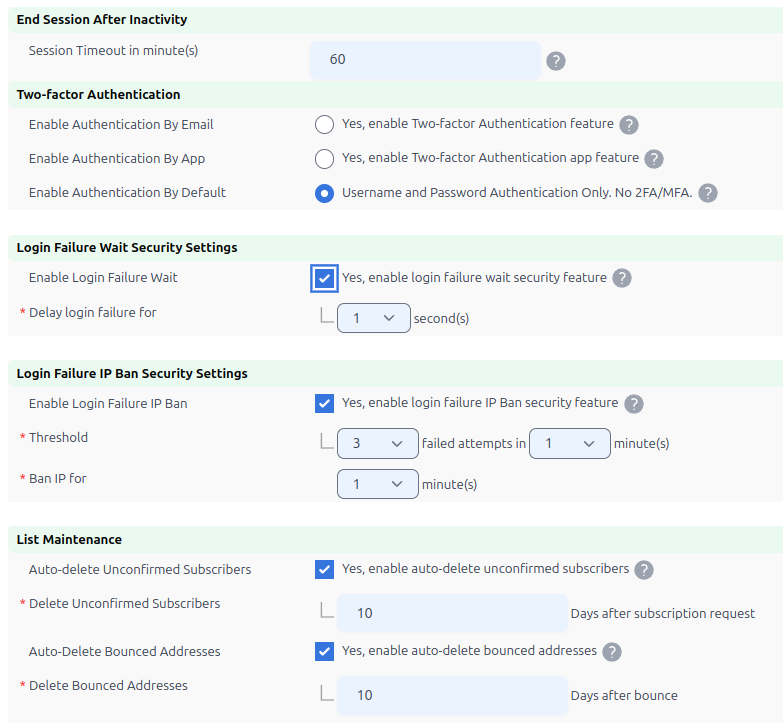
The Security Settings tab allows configuration of various security features including session timeouts, two-factor authentication, login failure handling, and automatic subscriber management. These settings help prevent automated attacks and password‐guessing attempts by locking out users who repeatedly provide incorrect login details.
To manage Interspire Email Marketer’s security settings:
- Click Settings in the toolbar, then click the Security settings tab.

Settings: Security Settings
Session Timeout
- If you want to interrupt the current session after a period of inactivity, enter the time (in minutes) in the Session Timeout in minute(s) field. Entering 0 means no timeout.
Two-Factor Authentication Options
You can choose from several authentication methods:
-
Username and Password Authentication Only - This is the default option that requires only username and password for login.
-
Enable Two-factor Authentication - This option requires users to provide an OTP (One Time Password) every time they login to their accounts.
- In the OTP Threshold field, select the number of failed attempts allowed before the user is banned.
- In the OTP Resend Threshold field, select the number of times the user is allowed to request OTP resends before being banned.
-
Enable Two-factor Authentication app feature - This option allows users to use authentication apps like Google Authenticator for two-factor authentication.
- In the failed attempts field, select the number of failed attempts allowed before the user is banned.
Login Security Features
-
Enable login failure wait - When enabled, this feature adds a time delay after incorrect login attempts. The user must wait the specified number of seconds before being able to attempt to log in again.
- Select the delay time (in seconds) from the dropdown list.
-
Enable login failure IP Ban - When enabled, this feature prevents users who repeatedly provide incorrect login information from attempting to log in again for a specified time.
- In the Threshold field, select the number of failed login attempts permitted (from the same IP address).
- In the within field, select the time period in which these failed attempts must occur.
- In the Ban IP field, select the length of time for which the IP address is banned from attempting to log in.
List Maintenance
These settings are used to automatically delete unconfirmed subscribers and bounced addresses. This results in cleaner lists. The caveat though is that you loose historical data for the addresses that are deleted. To use this feature, it is a two-step proces. The criteria for deletion is set below, and how often the process runs is set in the Cron Jobs section. If the job type is set to disabled, the feature will not execute.
-
Auto-delete Unconfirmed Subscribers - When enabled, this feature automatically deletes subscribers who have not confirmed their subscription.
- Check the box to enable this feature.
- In the Days after subscription request field, enter the number of days (e.g., 10) after which unconfirmed subscribers will be deleted.
-
Auto-Delete Bounced Addresses - When enabled, this feature automatically deletes email addresses that have bounced.
- Check the box to enable this feature.
- In the Days after bounce field, enter the number of days (e.g., 10) after which bounced addresses will be deleted.
Saving Your Changes
- Click Save when you have finished configuring your security settings.
- Alternatively, click Cancel to return to the previous screen without saving your changes.