Triggers
Viewing and Managing Triggers
To view the event triggers already set up in Interspire Email Marketer, click Autoresponders in the navigation bar, then View triggers.
Note: Before you set up triggers, you need to enable scheduling (cron jobs). See Cron Jobs for more information.
Viewing Triggers
| Create a trigger | Click this to set up a new trigger event. See Creating and Editing Triggers for information on the screen that displays. |
| Choose an action | Select one or more triggers’ checkboxes, choose an item from the list, and click Go to perform the action on the selected trigger (or triggers). - Select Delete selected trigger(s) to remove the selected trigger (or triggers) from Interspire Email Marketer. Deleted triggers cannot be retrieved. - Select Mark selected trigger(s) as active to enable the trigger (or triggers). - Select Mark selected trigger(s) as inactive to disable the trigger (or triggers). |
| Select a box belonging to a trigger before choosing an option from the Choose an action list. Select the box at the top of the column to select all triggers. | |
| Name | This displays the name that you assigned to this event trigger. This name does not display to the public. |
| Created | This displays the date on which you created the event trigger. |
| Triggered by | This displays information about the type of event that sets off the trigger. - Predefined date displays if you selected Based on a specific date when you created the event trigger. - Custom field displays if you selected Based on a contact’s date field when you created the event trigger. - Link clicked displays if you selected Based on a link being clicked when you created the event trigger. - Email campaign opened displays if you selected Based on a email campaign being opened when you created the event trigger. |
| When | This displays information about when the relevant action occurs. - Immediately after displays if you selected On or On the date when you created the event trigger. - [X] hours before displays if you selected Before [X] hours when you created the event trigger. Note: Even if you selected [X] days or [X] weeks when you created the event trigger, the relevant number of hours displays. - N/A displays if you selected an option other than those above when you created the event trigger. |
| Active | - A tick ( - A cross ( |
| Action | - Click Edit to modify the trigger. The Edit trigger screen’s General settings tab displays (see Creating and Editing Triggers). - Click Copy to create a new trigger with the same properties as the original. The new trigger displays with Copy of prepended to its name. - Click Delete to remove the trigger from Interspire Email Marketer. Deleted triggers cannot be retrieved. |
Creating and Editing Triggers
- To create a new event trigger, click Autoresponders in the navigation bar, then click View triggers. In the screen that displays, click the Create new trigger button.
- To edit an existing event trigger, click Autoresponders in the navigation bar, then click View triggers. In the screen that displays, click the existing trigger’s Edit link.
The General settings tab displays.
Note: If you are editing an existing event trigger, additional tabs may also display.
The General Settings Tab
The General Settings tab displays when you create or edit an event trigger.
Create a New Trigger: General Settings
| Name your trigger | Enter a descriptive name for this event trigger. This name displays only in the configuration interface, and not to your contacts. |
| Activate this trigger | Select the type of event that should set off this trigger, and configure the additional fields that display. See Trigger Activation Options for information on configuring this field. |
| Trigger the actions | Once you have selected an option in the Activate this trigger field, use this field to configure when the action should take place, in relation to the trigger event. The fields that display depend on the option you selected in the Activate this trigger field. - If you selected Based on a contact’s date or Based on a specific date, the following fields display: Date-Based Trigger Options In the first field: Select On to perform the action at the relevant time. Select Before to perform the action before the relevant time. In the additional fields that display, enter the required number of Hours,Days or Weeks before the time. Select After to perform the action after the relevant time. In the additional fields that display, enter the required number of Hours, Days or Weeks after the time. In the second field: Select The date to perform the action at the relevant time, and at no other time. Select The next anniversary of the date to perform the action at the next month and day (ignoring the year), and at no other time. Select Every anniversary of the date at the specified month and day, every year. - If you selected Based on a link being clicked or Based on a email campaign being opened, one of the following fields display: Email-Based Trigger Options Select When to perform the action at the moment the contact clicks the link or opens the email. Select After to perform the action at the moment the contact clicks the link or opens the email. In the additional fields that display, enter the required number of Hours, Days or Weeks after the event. |
| When triggered | Use this field to specify what should happen when the trigger is set off: Note: You can select multiple options in this field - If you want to send an email to the contact when the trigger is set off, select Send an email campaign. When Triggered: Send Email Campaign The list that displays contains all the email campaigns currently configured in Interspire Email Marketer. Select the required campaign from the list. Click Preview to open the selected email campaign in a new browser window. Note: When you select this option, the Sending options tab appears. Remember to configure this tab before you save the trigger (see The Sending Options Tab). - If you want to add contacts to another contact list when the trigger is set off, select Add the contact to an additional contact list. 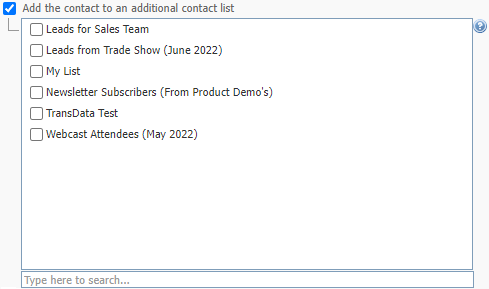 When Triggered: Add the Contact to an Additional Contact List Select the contact list (or lists) from the field that displays. - If you want to delete the contact from the original contact list, select Remove the contact from the contact list that they are in. Note: If you do not additionally select Add the contact to an additional contact list, the contact’s details cannot be retrieved. |
| Is trigger active? | Select this option to enable the trigger. When the event occurs, the trigger is set off. Deselect this option to disable the trigger. When the event occurs, the trigger is not set off. |
| Save | Click this to save your changes in this screen and return to the View triggers screen. |
| Cancel | Click this to return to the View triggers screen without saving your changes. |
Trigger Activation Options
This section describes the options available in the Create a new Trigger screen’s Activate this trigger field.
Based on Contact’s Date Field
- Select Based on a contacts date field to set off the trigger based on a custom date field (for example, “Birth Date”).
- In the first list that displays, select the contact list to which you want to associate this trigger. In the second list, select the custom date field on which you want to base this trigger.
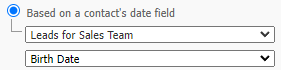
Activate Trigger Based on Contact’s Date Field
Note: To use this option, the contact list that you select must have at least one custom date field defined (for example “Birth Date”). For more information on setting up custom date fields and associating them with contact lists, see Creating and Editing Custom Fields and Date Field.
Note: When you select this option, you may apply the trigger to only a single contact list.
Based on a Specific Date
- Select Based on a specific date to set off the trigger based on the date that you specify.
- First, click the calendar icon that displays (
 ) and select the date on which you want to base this trigger. Next, select the contact list (or lists) to which this trigger should apply from the Assign trigger list.
![]()
Activate Trigger Based on Specific Date
Note: When you select this option, you may apply the trigger to multiple contact lists.
Based on a Specific Date and Time
- Select Based on a specific date Time to set off the trigger based on the date and time that you specify.
- Use the drop-down menus to select the date and time you want to use for this trigger.
![]()
Activate Trigger Based on Specific Date and Time
Note: When you select this option, you may apply the trigger to multiple contact lists.
Based on a Link Being Clicked
- Select Based on a link being clicked to set off the trigger based on when a contact clicks a link in an email. In the first list that displays, select the campaign that contains the link. The second list contains the target URLs of all the links in the campaign you select. Select the required target URL.
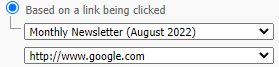
Activate Trigger Based on Link Being Clicked
Note: When you use this option, the email campaign that you select must contain at least one link.
Based on an Email Campaign Being Opened
- Select Based on an email campaign being opened to set off the trigger based on when a contact opens an email.
- The list that displays contains all the email campaigns currently configured in Interspire Email Marketer. Select the required campaign.
![]()
Activate Trigger Based on Email Being Opened
Note: When you select this option, the trigger applies to all contact lists.
The Sending Options Tab
This tab displays only when you select the Send an email campaign option in the General settings tab.
Create a New Trigger: Sending Options
| Send from this name | This is the name of the person from which the triggered email will be sent. This displays your user’s full name (specified in your user account settings; see Creating and Editing User Accounts). If you want to use a different name, enter the new name in this field. |
| Send from this email address | This is the email address from which the triggered email will be sent. This displays your email address (specified in your user account settings). If you want to use a different name, enter the new name in this field. |
| Send reply emails to | This is the email address to which a contact’s reply email will be sent. This displays your email address (specified in your user account settings). If you want to use a different name, enter the new name in this field. |
| Send bounced emails to | Enter the address to which undeliverable emails are sent. |
| My “first name” custom field is | If you use a custom field to define a recipient’s first name, select it here. If you use a single field to define a recipient’s name, select it in this field. |
| My “last name” custom field is | If you use a custom field to define a recipient’s last name, select it here. If you use a single field to define a recipient’s name, leave this field blank. |
| Send your email as multipart | Select this to send both HTML and text elements of a multipart email campaign to recipients. This allows a recipient’s email client to choose the correct display method. Note: Use this option if you are unsure. Also, use this option if you don’t provide your recipients with the ability to choose HTML or text emails. |
| Track open rates for html emails | Select this to have Interspire Email Marketer track the proportion of HTML emails opened by their recipients. |
| Track links clicked in this email | Select this to have Interspire Email Marketer track the proportion of links in this email campaign that are clicked by the recipient. You can view the results of clicked links in the Statistics > Email campaign statistics. |
| Embed images as attachments | Select this to embed the images you send in HTML emails, rather than linking to them. This allows recipients to view the email campaign offline, but can increase the email size significantly. |
| Save | Click this to save your changes in this screen and return to the View triggers screen. |
| Cancel | Click this to return to the View triggers screen without saving your changes. |