Introduction
You can configure Interspire Email Marketer to use one of the most affordable email sending services, Amazon Simple Email Service (SES). This guide walks you through the steps to use Amazon SES to send email with Interspire Email Marketer (IEM).
The setup consists of three main parts:
- The initial setup of SES in your AWS Account.
- Configuring the SMTP details in Interspire.
- Moving your Amazon SES from the sandbox to production mode.
Initial setup of SES in your AWS Account.
Login directly to the AWS Management Console for SES at https://console.aws.amazon.com/ses/. If you are logged into the AWS main console, to open the SES console, from the Services Dashboard navigate to Business Applications then choose Amazon Simple Email Service.
Create a Verified Identity.
The first part is to create one to three verified email addresses. The first address will be the one you use as your sending address. This is the address you will fill-in for List Owners Email and List Reply-To Email when you setup your contact lists in Interspire.
The second email address will be used to receive and process bounces. This is the address you will enter for List Bounce Email in Interspire.
The third address will be used for testing purposes while still in the Amazon SES sandbox (you can reuse the bounce address temporarily for testing purposes).
In this tutorial we are a going to verify the ownership of email addresses one at a time. The steps to verify a domain are just as straightforward if you choose to go that route.
- Create a verified identity by clicking on the
Create Identitybutton on the upper right corner of the dashboard. - Click on the
Email addressradio button. - Enter the email address you want to verify. E.g.:
[email protected].
Amazon will send you a verification email to the address that you have entered.
- Log into your email system and find the email Amazon sent.
- Click on the verification link included in the email.
You will be redirected to an Amazon page confirming the creation of a verified identity email address.
Although you can now start sending email from this address, at this point you are still in the sandbox and can only send to other verified addresses. Let’s repeat the steps above to create the other identities:
Create SMTP Credentials
The next steps are to create the STMP credentials that Interspire will use to communicate with Amazon SES. Amazon has a comprehensive guide on how to create those credentials at https://docs.aws.amazon.com/ses/latest/dg/smtp-credentials.html.
- Click on the Account Dashboard on the left-hand side menu.
- On the page, search for the Section
Simple Mail Transfer Protocol (SMTP) settings. - Click on the button
Create SMTP credentials. It will bring you to the IAM Console to create a new IAM User. - Enter an IAM User Name such as
ses-iem-smtp-useror accept the proposed name. - Click on
Create. A page with the newly created user appears. - Click on
Show User SMTP Security Credentials. The user details will appear. - Click on
Download Credentialsat the bottom right of the screen.
This is the only time you will be able to see or download those credentials. Make sure you copy and save them in a secure place.
- Click on
Close Window
Setup Interspire
SMTP Connectivity
Now that the Amazon side is setup, let’s configure Interspire to use it. The credentials created above are specific to an Amazon region. Each region has different endpoints to connect to. Consult https://docs.aws.amazon.com/general/latest/gr/ses.html to get a list of endpoints and select the one that is relevant to the region you have used to setup the credentials in the previous step. Make sure you select the SMTP end point and not the API (HTTPS protocol) end point.
- In your Interspire Email Marketer control panel, go to
Settings->Email Settingsand find theMail Server Detailssection of the page. - Select
Let me specify my own SMTP server details. - For SMTP Hostname enter the correct end point for your Amazon region. E.g.:
email-smtp.us-east-1.amazonaws.com - For SMTP Username and SMTP Password, enter the credentials that you created in the previous step.
- For SMTP Port enter
587.
We used to recommend using with Amazon SES port 465 but the use of this port has been deprecated and the standard encrypted SMTP port is port 587 with STARTTLS.
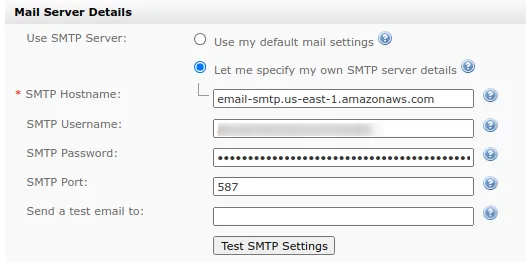
Send a test email to another verified email address:
- In
Send a test email toenter[email protected] - Click on
Test SMTP Settings. - If you see:
A test email has been successfully sent to the email address…, then you are almost all set. - Verify you have received the test email.
Configure Sending Limits
Amazon limits the number of emails per second you can send, as well as the number of emails you can send in a 24-hour period. Determine what they are from the Amazon SES Dashboard in the Sending limits section.
From the Interspire Email Marketer control panel, go to Settings -> Email Settings. Set the Max Hourly Rate to be slower than what is allowed. For example if your maximum send rate is 1 email per second, set this to 3500 rather than 3600. If it is 2 emails per second, then set it to 7000 rather than 7200.
IEM does not have a setting to restrict the number of emails it sends in a 24-hour period. You will need to manage this limit by Amazon SES outside of Email Marketer. You should be able to increase your limit quickly with Amazon if you follow their guidelines.
Request Production Access
After completing your initial testing with the verified addresses, ask Amazon to move your account out of the sandbox into production.
- Click on
Request Production Accessfrom the SES dashboard. A form will be displayed. - Fill it out completely.
Amazon will respond to your request within 24 hours.
Next Steps
The email address method for verified identities will not setup basic SPF and DKIM records. Consult this guide from Amazon to generate those records then add them to your DNS.
Now that you have Interspire Email Marketer set up to use Amazon SES to send your campaigns, monitor your Amazon statistics regularly. Watch your sending activity and your sender reputation closely.
As a good email citizen send emails that your audience wants and is asking for. Enjoy enterprise email marketing done in one of the most powerful and cost effective ways.
Additional Resources:
https://www.interspire.com/deliverability/
https://docs.aws.amazon.com/ses/latest/dg/Welcome.html