Cron is the standard Unix/Linux scheduler enabling you to execute commands at recurring intervals. Windows offers its own alternative scheduler with the Windows Task Scheduler.
Although there is no drop-in cron available in vanilla Windows, there are a number of options in addition to Windows’ Task Scheduler to execute jobs on a recurring schedule with the installation of additional software and/or subsystems. Some of them may be more appropriate than others depending on the use case.
Let us review how to setup the Windows equivalent of cron with Scheduled Tasks. Then we will explore of some of the other options to have cron-like functionality in Windows. They are: Windows Subsystem for Linux and Cygwin, other Windows scheduling software, and two of the GUI-based server management software (Plesk and WHM cPanel),
How do I set up scheduled tasks on a Windows server?
Windows offers its standard Task Scheduler to execute commands and scripts on a recurring schedule. Creating scheduled tasks can be done calling “Schtasks.exe” directly from the command line or using the GUI. One can also use the Powershell cmdlet Register-ScheduledJob to create scheduled jobs that will be executed by the Windows Task Scheduler.
We will expand on running a PHP script an a recurring schedule using the command line although the instructions can be applied to run any arbitrary programs.
Note: Create a batch file (optional). There are a number of advantages to creating a batch file and adding the command and parameter to be executed in the file. For example: You don’t need to edit the scheduled task unless the schedule needs to be updated, which require administrative privileges depending. If you are using a batch file to schedule the task, you can just edit the batch file to reflect the new command line.
If you are using XAMP for PHP, a batch file could look something like:
@echo off
D:\xampp\php\php.exe -f D:\www\yoursite.com\iem\admin\cron\cron.php > NUL
In the admin\cron directory, there is a file called “cron.php”. This is the file that you reference to execute Interspire meta scheduler. You will need the full path to this file, for example:
D:\www\yoursite.com\iem\admin\cron\cron.php. Note that this path may be different on your web server and needs to be adjusted accordingly.
Task Scheduler Command Line
Scheduling Tasks using the command line is a matter of invoking “schtasks.exe” with the appropriate parameters. In its simplest form, to create a scheduled task that would run every 5 minutes invoking the hypothetical batch file above could be done by issuing:
C:\Users\demouser>schtasks.exe /Create /SC minute /MO "5" /TN "Interspire Cron" /TR "D:\bin\cron.cmd
The details of the syntax are well documented and can be consulted for more complex scenarios.
Task Scheduler GUI
The Task Scheduler GUI can be invoked by using the built-in search and either typing “Task Scheduler”, pressing “command R” and typing “taskschd.msc”, or by navigating to /Start/Windows Administrative Tools/Task Scheduler.
The Microsoft Management Console will open in a new window.
You can click on Create Task… which will give you access to set all the parameter of a scheduled task. Or you can click on Create Basic Task… which will start a wizard that will guide you through the creation process.
If you started the wizard with the Create Basic Task… the first step of the wizard is to enter a name and description for the task:
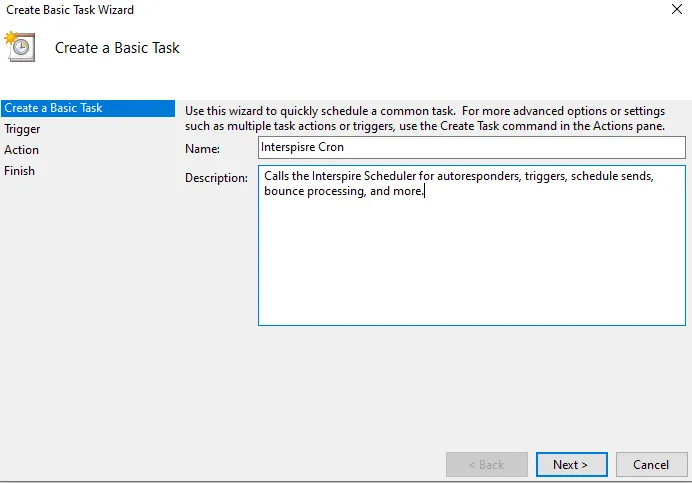
Enter them then click on Next. The next screen is going to ask about what will trigger the task. Let’s select daily for this scenario:
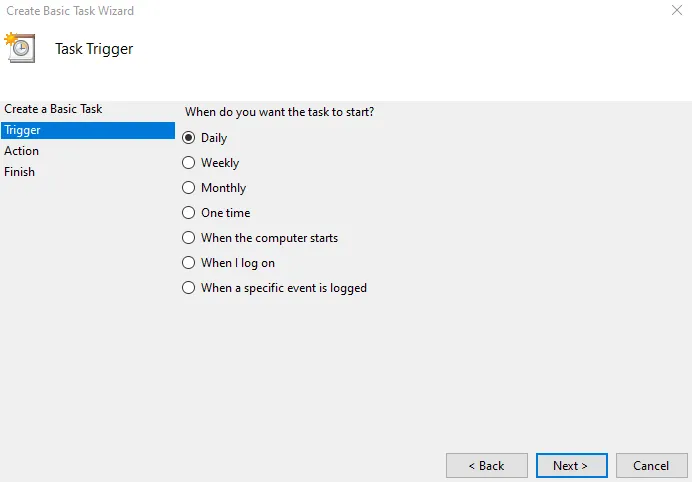
Click on Next. The next screen will allow you to set the recurrence. Let’s set it at Recur every day:
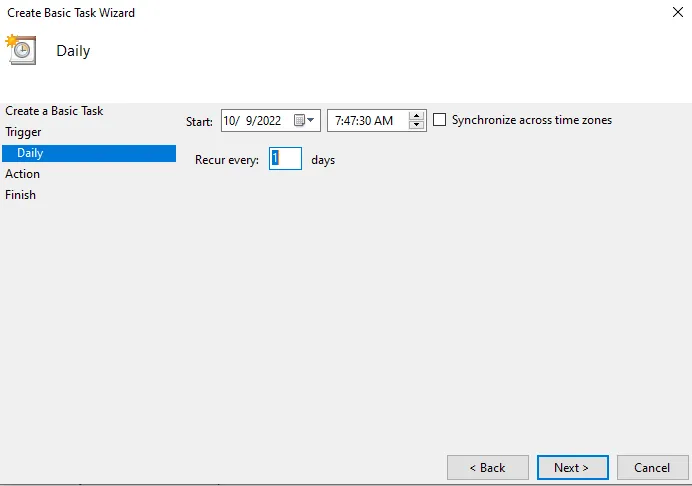
Click on Next. And now you can select which command or script you can execute. Let’s re-use the hypothetical batch file from above:
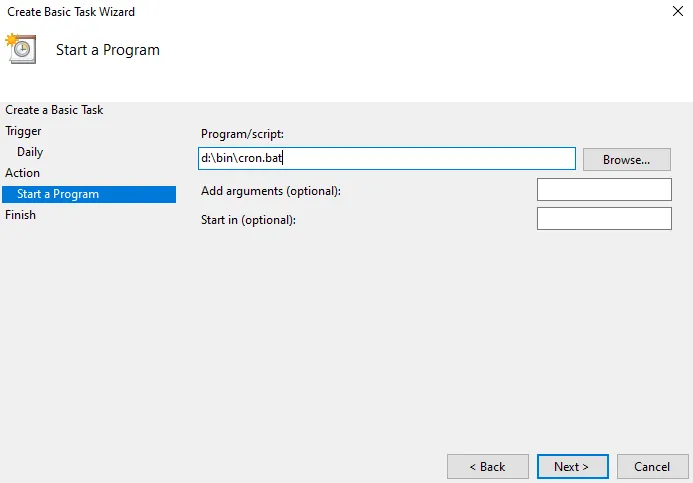
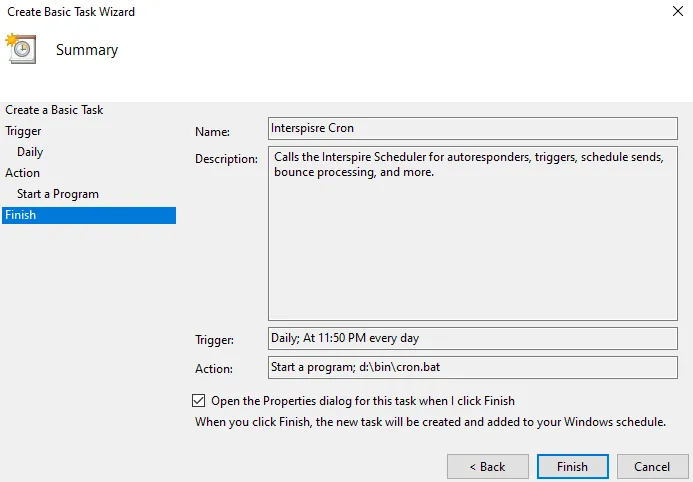
The last step of the wizard will present a summary of the scheduled task you just created:
Click on Finish.
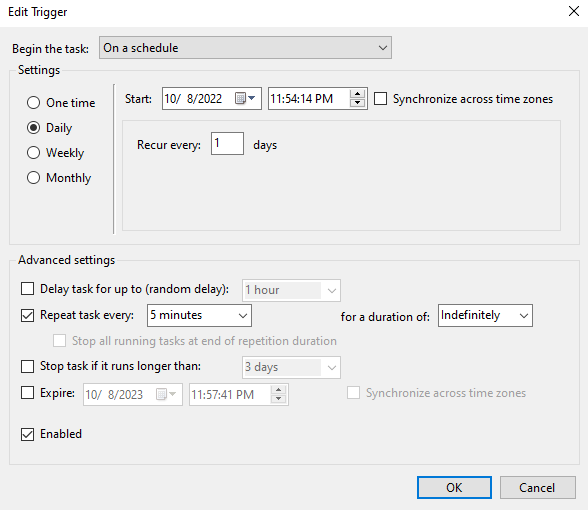
Note that the wizard does not offer to run a task more than once a day and the Trigger properties would have to be amended to run a task more than once a day. Find the task in the Task Scheduled list, right-click and edit the task, go to the Triggers tab and click on Edit…. Let’s set this task to run every 5 minutes for example:
Click on OK to save your changes.
Powershell Register-ScheduledJob
You can also create scheduled jobs using Powershell and the Register-ScheduledTask cmdlet. A typical format is to call the cmdlet and pass the Action, Trigger, and TaskName to be created. To create our quintessential example of running a batch file every 5 minutes, open Powershell and issue the following:
PS C:\Users\demouser> $jobname="Interspire Tasks Every 5mn"
PS C:\Users\demouser> $action=New-ScheduledTaskAction -Execute 'c:\bin\cron.bat'
PS C:\Users\demouser> $schedule=New-JobTrigger -Once -At (Get-Date).Date -RepeatIndefinitely -RepetitionInterval (New-TimeSpan -Minutes 5)
PS C:\Users\demouser> Register-ScheduledTask -TaskName $jobname -Action $action -Trigger $schedule
Some will notice the schedule uses “New-JobTrigger” and not “New-ScheduledTaskTrigger”. I could not find a recurring interface below daily execution for “New-ScheduledTaskTrigger”. It seems that “Register-ScheduledTask” will take a New-JobTrigger argument for its schedule.
Alternatives to the Task Scheduler
Depending on your needs or preferences, using the native Windows Task Scheduler may not be the ideal choice. Let’s explore next two options which essentially install a Unix look alike (I know the two approaches are very different and neither are actually Unix look-alike).
Windows Subsytem for Linux
Microsoft offers Windows Subsystem for Linux. WSL basically allows you to install a Linux distribution of choice on top of Windows. The subsystem is completely integrated within windows allowing for seamless use of Windows programs and Linux tools along side each other within the same environment. The corollary is that the Linux cron system now becomes available for use within Windows.
There are many guides on installing WSL and will instead focus on some caveats to use cron in WSL.
The three main caveats of using cron from WSL are:
- WSL does not start by default on boot
- The cron services does not start by default with WSL
- WSL needs a privileged password to start the cron service.
Shout out to Ian Paul for his wonderful article “How to Launch Cron Automatically in WSL on Windows 10 and 11“, which provides a step-by-step way address the caveats above.
Let’s tackle the last one by allowing all to start the cron service without a password using sudo.
Edit the sudoers file
sudo visudo
Towards the end of the file right before the “includes” if you have any, add the following entry:
%sudo ALL=NOPASSWD: /usr/sbin/service cron start
Save the sudoers file. Next, let’s add a scheduled task using the Windows Task Scheduler to ask WSL start the cron service at boot time:
You can use the wizard as oulined above or do it from a privileged command line:
C:\users\demouser> schtasks.exe /Create /SC ONSTART /TN "Start WSL Cron Service at Boot Time" /TR "wsl.exe sudo /usr/sbin/service cron start”
One final note would be select that the service “Runs whether user is logged in or not”. Now the WSL cron service will start at every boot and Unix style crontabs can be used.
Cygwin
Cywin takes a totally different approach. Paraphrasing cygwin.com, Cygwin is a large collection of GNU and other open source tools that provide functionality similar to Linux in Windows. One of these tools is crontab.
Again, we will assume that Cygwin is already installed by running setup-x86_64.exe as detailed on the Cygwin web site. Cron is not part of the default installation set of Cygwin and must be added if it was not added already.
Start a Cygwin Terminal as an Administrator. Then instrall cron as a service on cygwin:
cygrunsrv --install cron --path /usr/sbin/cron --args -n
Another shout out this time to David J Nice for https://www.davidjnice.com/cygwin_cron_service.html regarding in particular what arguments to pass to cron on startup.
Once this is done, you can use the usual GNU/Linux commands to manage cron such as crontab -e to edit your crontab. You can review our article “Setting Up Scheduled Sending Using Cron“ to get more details on the crontab file format.
Other Windows Scheduling Software
In addition to using the vanilla Task Scheduler or installing Linux tools alongside / on top Windows, there are also a number of Windows scheduling apps. Some are:
- Z-cron https://z-dbackup.de/en/z-cron-scheduler/
- Visual Cron https://www.visualcron.com
The internet also has a number of sites compiling lists of windows scheduling software
Web Control Panel
The last category we will mention are for servers that are managed via a web-based control panel such as Plesk. Although Plesk is mostly used to managed GNU/Linux servers, it can also be installed on Windows server as well.
Plesk calls their cron / scheduling “Scheduled Tasks”.
If you have multiple domains, select the domain you want to add a scheduled task for.
Navigate to the Scheduled Tasks/Add Task to schedule a new task.
Choose “Run a command” the the task type.
Enter the command you want schedule.
Select the frequency for recurring tasks or the specific date and time as appropriate.
If possible, click “Run Now” to verify the setup, then on “OK” to save the new schedule task.
Refer to the Plesk Documentation for more details.
Final Thoughts
Although Windows does not have a drop-in cron like system, it offers the Windows Task Scheduler which provides equivalent scheduling services. With a little bit of legwork, one can also have access to more cron-looking scheduling using Windows Services for Linux and Cygwin. Also, there are native Windows Task Scheduler alternatives, and lastly, it is possible to have access to a Windows server that is managed by a web based control panel.
The best approach to use will depend on your use case and personal preferences. Happy Windows scheduling.

