
How do I Install Interspire Email Marketer
Welcome to the Interspire Email Marketer Installation Guide. This guide is designed to walk you through the process of installing Interspire Email Marketer on your server. Following these instructions will ensure a smooth installation and minimize errors.
System Requirements
Make sure that your system meets the server requirements for the version of Interspire Email Marketer that you are installing. The easiest way to check that your server meets our software’s requirements is to upload the check_iem.php script to your server’s base website directory, and load it in your browser. If you see “NOT OK” in red on that page, please troubleshoot the issue with your hosting provider until everything says “OK” or “Unknown”.
Downloading Files
- Get the Latest Version: Download the latest version of Interspire Email Marketer using the link provided in your email receipt. This ensures you have the most up-to-date version.
- Extract the Archive: Unpack the downloaded ZIP file on your local machine using built-in extraction utilities or tools like WinZip or 7-Zip.
Uploading Files
- Create a New Directory: Connect to your web server using an FTP client like FileZilla or cPanel’s File Manager. Navigate to the desired installation location and create a new directory for Interspire Email Marketer (e.g.,
/iem/). - Upload Files: Upload the contents of the extracted folder to this newly created directory. Ensure that you are transferring the files inside the extracted folder, not the folder itself.
- Alternative (SSH Method): If you have SSH access, use SCP or SFTP to transfer the files directly for a faster and more secure upload process.
Setting File Ownership and Permissions
We now need to correctly set the ownership and permissions of the Interspire files.
1. Ensure Correct File Ownership
The files and directories should be owned by the same user that the web server runs as. Without proper ownership, you may encounter issues modifying files or running the application. Use the following command to adjust ownership:
chown -R www-data:www-data /path/to/your/interspire- Replace
www-datawith the appropriate web server user for your system (e.g.,apachefor CentOS/RHEL). - If you are uncertain about the correct ownership settings, consult your hosting provider, as configurations can vary across different server environments.rchase.
2. Configure Write Permissions
After setting the correct ownership, adjust file and directory permissions as follows.
2a. Configuration File:
chmod 664 /path/to/your/interspire/admin/includes/config.php2b. Writable Directories:
Ensure the following directories are writable by setting their permissions to 775:
chmod 775 /path/to/your/interspire/admin/temp/
chmod 775 /path/to/your/interspire/admin/com/storage/
If you encounter permission-related issues, verify both ownership and permissions. If problems manifest, consult your hosting provider for guidance on the proper file permissions settings for their configuration.
Database Setup
Interspire Email Marketer uses a MySQL or MariaDB database to store your data. This database must be created before running the installation wizard, and the corresponding database user must be granted full privileges. Since the setup process may vary depending on your hosting provider and control panel, here are general steps:
- Access Your Database Management Interface
- Log in to your web hosting control panel (e.g., cPanel, Plesk) or access your server via SSH.
- Create a New MySQL/MariaDB Database and User
- Create a new database and set its collation to
utf8_general_ciduring creation. - Create a new database user and assign it to the database with full privileges.
- Create a new database and set its collation to
- Record Your Database Credentials
You will need the following details during the installation wizard:- Database Name
- Username
- Password
- Hostname (typically
localhost, unless your host specifies otherwise)
If you’re unsure about any of these steps, refer to your hosting provider’s documentation or contact their support for assistance.
Setup Wizard
Interspire Email Marketer includes a simple one-step installation process.
To start the setup wizard, navigate to the directory that you uploaded Interspire Email Marketer to, for example: https://www.yoursite.com/iem/. The Interspire Email Marketer setup wizard will appear.
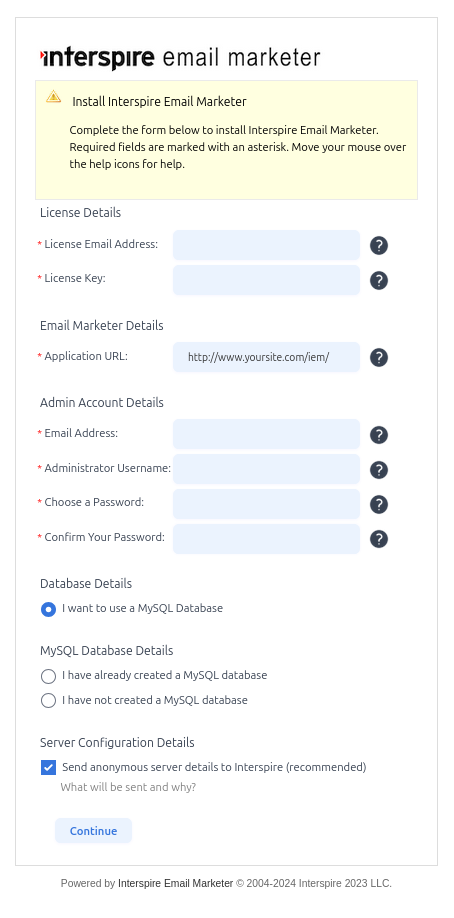
The setup form contains the following fields:
- License Email Address – Enter the email address used to purchase Interspire Email Marketer.
- License Key – Copy and paste the license key provided in your purchase confirmation email.
- Application URL – Enter the full URL where Interspire Email Marketer is installed. If installed in a subfolder, use that path instead of your main website URL.
- Administrator Email Address – This will be the super admin’s email and the default contact address. You can update it later in the settings.
- Administrator Username – Choose a username for the admin account.
- Password & Confirm Password – Set a password for the admin account.
- Database Information – Provide the database details:
- Database Name
- Database Username
- Database Password
- Database Host (typically
localhost, but this may vary depending on your host).
- Your license is a perpetual software license for the version purchased or upgraded during the support period for the domain provided at the time of purchase.Checking this option sends basic information about your server to us, such as the PHP version, MySQL version, and other relevant details.
Once submitted, the wizard will:
- Save your configuration details in
~/admin/includes/config.php. - Create the necessary database tables to complete the setup.
Congratulations, you are now ready to login to the Interspire Email Marketer control panel and start on your first email campaign! Your control panel will be accessible by adding “/admin” to the end of your instance URL.
You can also reference our Ubuntu specific installation guide or consult the guide geared towards a cPanel-based installation.
- Set up cron on your server (
/Settings/Cron Settings) – your webhost should be able to help with setting a cron job on your server. - Set up bounce processing (
/Settings/Bounce Settings).
Post-Installation Configuration
Now that Interspire Email Marketer is installed, the next steps ensure optimal performance, reliable email delivery, and proper automation.
- Configure Your SMTP Server (
Settings > Email Settings)
Set up your SMTP server or third-party email provider to handle outgoing emails efficiently. The default mail settings are intended for diagnostics and testing but are not suitable for reliable volume email delivery. If you don’t have an SMTP provider, check with your hosting provider or contact us for recommendations. - Set Up Cron Jobs (
Settings > Cron Settings)
Scheduling cron jobs ensures that automated tasks like scheduled campaigns, autoresponders, and bounce processing run without interruption. Your hosting provider can assist with configuring a cron job if needed. - Enable Bounce Processing (
Settings > Bounce Settings)
Properly handling bounced emails is essential for maintaining clean, responsive mailing lists that are essential to deliverability.
Completing these steps is key to ensuring smooth operation, efficient email delivery, and seamless automation.
Migration Guide
If you need to move your Interspire Email Marketer installation to a new server or domain, follow these steps to ensure a smooth migration.
Verify New Server Requirements
Before starting the migration, confirm that your new server meets the necessary software requirements as if it was a new installation:
- Download our check_iem.php script and upload it to your new server.
- Open it in your browser to verify compatibility.
- If any items are marked NOT OK, troubleshoot with your hosting provider before proceeding.
There are essentially the same steps as for a new installation.
Backup Your Current Installation
Create a full backup of your current installation:
- Database Backup: Use a web-based tool like phpMyAdmin or Adminer or good old mysql dump to export your Interspire Email Marketer database. If you are unsure, ask your web hosting provider to provide a database dump.
- Files Backup: Copy all Interspire Email Marketer files from your existing server to your local machine. It maybe more effective to zip the Interspire installation and to download the zip file instead.
Transfer Files & Database to the New Server
- Upload Files: Transfer the backup files to the new server using FTP, SCP, or your hosting panel’s File Manager.
- Import Database: Use phpMyAdmin, Adminer, or MySQL command-line tools to restore your backup database into the new server’s MySQL/MariaDB instance.
Update Configuration File
Locate and edit the configuration file at:
~/admin/includes/config.phpUpdate the following values to reflect the new server environment:
- Database Server Name
- Database User & Password
- Database Name
- License Key (if your domain has changed, contact support for a license update—domain changes are considered on a case by case basis only for customers with active support).
Finalize Migration
- Test Login: Access the admin panel using your existing credentials.
- Remove Old Installation: Delete the old installation and associated cron jobs as needed. Be particularly mind full of cron jobs to avoid sending emails twice from the old instance.
- Set Up Redirects: If you have sent emails recently and need the links to remain functional, create a
.htaccessredirect on the old server (for Apache):
RewriteEngine on
RewriteRule (.*) http://www.newdomain.com/emailmarketer/$1 [R=301,L]
This ensures that link clicks continue to work.
How can I just change the folder that Interspire Email Marketer is installed in?
If you want to move Interspire Email Marketer to a different directory, you must update the configuration file and optionally set up redirects to prevent broken links.
Move the files:
Rename the subdirectory on your server.
Steps to Update the Path:
- Edit the Configuration File:
Open~/admin/includes/config.phpand update the following line to match the new folder location:define('SENDSTUDIO_APPLICATION_URL', 'http://www.domain.com/new-folder'); - Update Cron Jobs (If Applicable):
If you have scheduled tasks set up, update the cron job path in Settings > Cron Settings to ensure automation continues to function correctly. - Set Up Redirects (If Needed):
If you have sent emails containing links before the folder change, those links may break. To prevent this, use.htaccessrewrite rules (for Apache) to redirect requests from the old folder to the new one:RewriteEngine on RewriteRule ^old-folder/(.*)$ /new-folder/$1 [R=301,L]
Adjustold-folderandnew-folderto match your directory names. This ensures unsubscribe links, form submissions, and tracked links continue working.
Important Considerations Before Moving the Folder:
⚠️ Important: Changing the installation path will break unsubscribe links, form links, and tracked links from past emails unless redirects are configured as described in the migration section above.
- Unsubscribe & Confirmation Links: Any links in previously sent emails (such as unsubscribe, confirmation, and form links) will no longer work unless redirected .
- Tracked Links: If you have enabled link tracking, URLs in past emails may become invalid unless properly redirected .