Contacts
This chapter discusses how to use the Contacts menu in the navigation bar.

Contacts Overview
A contact is a person to whom you send email campaigns. Contacts can be added to Interspire Email Marketer in one of three ways.
- You manually create a contact record and input the information yourself.
- You import contacts from a CSV (Comma‐Separated Value) file. Interspire Email Marketer creates contact records for each entry.
- A contact signs up at your website. Interspire Email Marketer creates the contact record.
Contacts are arranged into contact lists. Each contact must belong to one contact list. See Contact List Overview for more information.
You can also arrange contacts using segments; lists of contacts in one or more contact lists that share certain criteria. See Segments for more information.
Each contact has a contact record that contains information about the person it represents. When you create a contact list, you specify the types of information you want to hold by selecting the fields for the list. All contact records in a list have the same fields.
There are two types of field: built‐in and custom. You can define custom fields yourself, using the Custom fields > Create a custom field screens.
The minimum required information for a contact is:
- Email address : required to send emails.
- Email format (HTML or text): required so that users with text‐only email clients are not sent HTML emails.
- Confirmation status (confirmed or unconfirmed): required so that you can use double‐opt‐in confirmation. When you use double‐opt‐in confirmation, users who sign up to your contact list receive an email to confirm that they want to join.
Note: Double‐opt‐in confirmation is not mandatory in the software. However, it is strongly recommended that you use it in order to avoid sending potentially unwanted emails and in many jurisdictions is part of the active consent process.
Event Logging Overview
Every contact in Interspire Email Marketer has a personal event log. This is a CRM (Customer Relationship Management) feature that allows any user of Interspire Email Marketer to instantly see information about interaction with the contact.
Events can be logged either automatically or manually.
When Interspire Email Marketer performs an action that relates to a contact (such as sending an email to the contact) an event is logged automatically.
When you want to log an event that Interspire Email Marketer cannot log automatically, such as a phone call or a meeting, you can add an event log entry manually (see Manual Event Logging).
To see a contact’s event log, either:
- Click the contact’s icon in the Contacts > View contacts screen.
- In a contact’s View contacts screen, scroll down to the Event log section.
Contacts
Viewing and Managing Contacts
To view the contacts stored in Interspire Email Marketer, click Contacts in the navigation bar, then click View all contacts.
You can:
- Add a new contact: add a contact to Interspire Email Marketer.
- Delete selected contact(s) : remove the selected contacts from Interspire Email Marketer.
- Update contacts to receive text campaigns : change the status of selected contacts, allowing them to receive emails in text format.
- Update contacts to receive HTML campaigns : change the status of selected contacts, allowing them to receive emails in HTML format.
- Update contacts status to confirmed : confirmed contacts are those who have replied to a confirmation request email. Use this to change the selected contact or contacts to confirmed status.
- Update contacts status to unconfirmed : unconfirmed contacts are those who have not yet replied to a confirmation request email. Use this to change the selected contact or contacts to unconfirmed status.
You can also view, edit and delete contacts.

Viewing Contacts
| View | By default, this displays All contacts. Click the triangular icon to view Contact lists or Segments.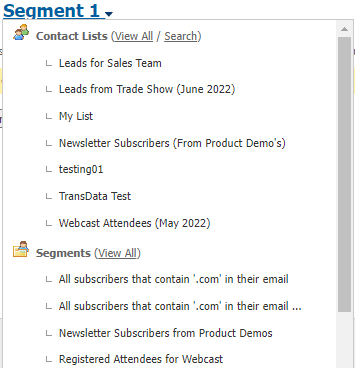 Contact List and Segment Menu |
| Search | Use this to search for contacts in the segment by their email address. Enter your search term in the text field and click the Search button. Click Advanced search to go to the Contacts > Search contacts screen. |
| Add a contact to my list | Click this to add a new contact to Interspire Email Marketer. The screen that displays is the same as the Contacts > Add a contact > Next screen. Note: When you use this option, the contact is not necessarily added to the segment. The contact is added to the segment only if it fulfils the segment’s criteria. |
| Choose an action | Select one or more contacts, select an option from the list and click Go to perform the selected action. |
 | Select a box belonging to a contact before choosing an option from the Choose an action list. Select the box at the top of the column to select all contacts. |
 | Click this icon to see the contact’s personal event log. Note: This icon displays only when a contact has personal event log entries. 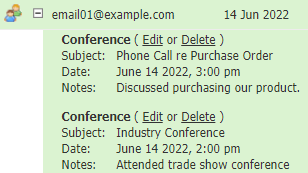 Contact Event Log For information on manual event logging, see Manual Event Logging. For information on automatic event logging, and event logging in general, see Event Logging Overview. |
| Email address | This is the address to which emails for this contact are sent. |
| Date added | This is the date this contact was added to the contact list. |
| Email format | - This displays HTML if the contact is configured to receive HTML emails. - This displays Text if the contact is configured to receive plain text emails. |
| Activity status | - This displays Active if emails are sent to the contact. - This displays Unsubscribed if the contact was unsubscribed from the list. - This displays Bounced if emails to this contact have not been delivered, and emails are no longer sent to the contact. |
| Confirmed | - This displays Confirmed if the contact has replied to a confirmation request email. - This displays Unconfirmed if the contact has not yet replied to a confirmation request email. |
| Contact list | This displays the name of the contact list to which this contact belongs. |
| Action | - Click View to see information about the contact. The Contacts > View contact screen displays (see Viewing A Contact). - Click Log event to manually add an entry to this contact’s event log. See Manual Event Logging for information on the screen that displays.- Click Edit to modify the contact’s information. The Contacts > Edit contact screen displays. - Click Delete to remove the contact from Interspire Email Marketer. |
Viewing a Contact
To view information about a contact stored in Interspire Email Marketer, click Contacts in the navigation bar, then click View all contacts. Click the relevant contact’s View link.

View Contact
| Edit contact | Click this to make changes to the contact’s information. See Adding or Editing a Contact for information on the screen that displays. |
| Delete contact | Click this to remove the contact from Interspire Email Marketer. A deleted contact’s information cannot be retrieved. |
| Go back | Click this to return to the previous screen. |
| Contact details | This section displays information about the contact. |
| Email address | This displays the email address to which emails for this contact are sent. |
| Email format | - This displays HTML if the contact is configured to receive HTML emails. - This displays Text if the contact is configured to receive plain text emails. |
| Confirmation status | - This displays Confirmed if the user has confirmed that he or she wants to be in your contact list. - This displays Unconfirmed if the user has not yet confirmed that he or she wants to be in your contact list. |
| Status | - This displays Active if emails are sent to the contact. - This displays Unsubscribed if the contact was unsubscribed from the list. - This displays Bounced if emails to this contact have not been delivered, and emails are no longer sent to the contact. |
| Contact request date | This displays the date and time at which the contact asked to be added to your contact list. |
| Contact request IP | This displays the IP address from which the contact requested to be added to your contact list, if known. This displays Unknown if the IP address is not known, or if the contact was added by an administrator. |
| Contact confirm date | If the contact has confirmed that he or she wants to be added to your contact list, this displays the date and time that this confirmation was made. |
| Contact confirm IP | This displays the IP address from which the contact confirmed that he or she wanted to be added to your contact list, if known. This displays Unknown if the IP address is not known, or if the confirmation was made by an administrator. |
| Event log | This section displays information about Interspire Email Marketer events that relate to this contact, or events that you have added to the log manually. See Event Logging Overview for more information. |
| Subject | This displays the subject of the event log entry. |
| Event type | This displays the type of event that the log entry describes. |
| Last updated | This displays the date and time that the log entry was created, or last edited. |
| Created by | This displays the username of the Interspire Email Marketer user who created the entry (for manual entries) or performed the action in Interspire Email Marketer that created the entry (for automatic entries). |
| Action | - Select Edit to make changes to the event log entry. See Manual Event Logging for information on the fields that display. - Select Delete to remove the entry from the event log. Deleted event log entries cannot be retrieved. |
Manual Event Logging
This section describes how to manually add an entry to a contact’s event log.
Note: For information on automatic event logging, see Event Logging Overview.
- To manually add an entry to a contact’s event log, either:
- Click the contact’s Log event link in the Contacts > View contacts screen.
- Click the Log event button while editing or viewing a contact.

- Enter an Event type. This allows you to easily categorize event log entries. If you enter a common event type (“Phone call”, “Meeting”, and so on), Interspire Email Marketer automatically adds an appropriate icon (if Interspire Email Marketer does not recognize the event type, it uses a generic calendar icon).
- Enter a Subject that describes this event log entry.
- Select a date and time for this log entry. Entries are ordered in the log by date and time.

Note: By default, the current date and time displays. If you want to log the event as taking place at the current date and time, you do not need to select a date and time.
- If you want to include additional information in the log, enter it in the Notes section.
- Click OK. The new entry displays in the event log.
Searching Your Contacts
Take the following steps to conduct an advanced search of your contacts.
Note: To conduct a simple search, use the Search box in the Contacts > View all contacts screen (and other screens).
- Click Contacts in the navigation bar, then click Search contacts.

Choose one of the Search options.
Select View specific contacts from within the selected lists below to search
contact lists. A list of contact lists displays below.Select View all contacts within the selected segments below to search segments. A list of segments displays below.
Select the Contact list(s) or Segment(s) you want to search below.
If you want to search for a contact list or segment, enter the list or segment’s name in the Type here to search field.
Click Next.

- Configure the Filter by basic details fields:
- If you want to search for all or part of an email address, enter it in the Email address field.
- If you want to search for contacts configured to receive HTML or Text emails only, select the relevant option from the Email format list.
- If you want to search for contacts who are Confirmed or Unconfirmed only, select the relevant option from the Confirmation status list. If you want to search for both, leave Both confirmed and unconfirmed selected (default).
- If you want to search for contacts who are Active, Bounced, or Unsubscribed, select the relevant option from the Activity status list.
- If you want to search for contacts who subscribed Before or After a certain date, Between two dates, or Exactly on a particular date, select Yes filter by date subscribed and make the relevant selection in the fields that display.

Select the day and month in the drop‐down list boxes. Enter the year in the field to the right. If you selected Between, configure the end date in the fields beneath.
- If you want to search for contacts who have, or have not, clicked a specific link in your email campaigns, select Yes filter by link.

If you want to find contacts who have clicked a link, select Has clicked in the first list, and select the relevant link in the second list.
If you want to find contacts who have not yet clicked a link, select Has not clicked, and select the relevant link in the second list.
If you want to search for contacts who have, or have not, opened a specific email, select Yes, filter by opened email campaign.

If you want to search for contacts who have opened an email, select Has opened in the first list, and select the email campaign in the second list.
If you want to find contacts who have not yet opened an email, select Has not opened, and select the email campaign in the second list.
- In the Visible fields section, select the fields that you want to see in the search results list.
- If the contact list contains custom fields, you can search each field in the Filter by custom fields section.
- Click Next.
- The Search results screen displays, showing the contacts the fulfill the criteria you specified. The fields in this screen are the same as those in the View contacts screen; see Viewing and Managing Contacts.
Adding or Editing a Contact
Take the following steps to add a contact to one of your contact lists:
Note: If you want to add contacts from a file, see Importing Contacts.
- Click Contacts in the navigation bar, then click Add a contact.

- Select the Contact list to which you want to add the contact. Click Next.

Enter the contact’s details:
- Enter the contact’s Email address.
- Select an option from the Email format list. If you want the contact to receive HTML emails, select HTML. If you want the contact to receive plain text emails, select Text.
Note: Contacts set to receive HTML emails can also receive text emails.
- Select a Confirmation status. If you want to send a confirmation email to the contact later, select Unconfirmed. Otherwise, select Confirmed.
If the contact list to which you are adding this contact has additional custom fields, enter the required information in the Custom field details section of this screen.
Click Save to add the contact to the list and enter another contact’s details.
Click Save and Exit to add the contact to the list and return to the first Add a contact screen.
Alternatively, click Cancel if you want to return to the previous screen without saving any contact details.
Removing Contacts
Take the following steps to permanently remove a contact from Interspire Email Marketer:
Note: You can remove contacts by entering their address manually, or by uploading a file containing the addresses of each contact you want to remove. Alternatively, use the Contacts View all contacts screen to delete single contacts.
Note: You can also use this procedure to mark contacts as unsubscribed; see step 4.
- Click Contacts in the navigation bar, then click Remove contacts.

- Select the contact list from which you want to remove contacts. Click Next.

- Define the contacts that you want to remove from the list:
- To enter the contact’s email addresses manually, select I want to type the email addresses of contacts into a text box. Enter the addresses in the field that displays.

- To upload a list of email addresses, select I want to upload a file that contains the email addresses of contacts.
Note: The file that you use should contain email addresses only, one address to a line.

Enter the filepath of the file you want to use, or click Browse and locate the file.
- Use the For the contacts above field to specify whether you want to delete the contacts permanently, or just mark them as unsubscribed:
- If you want to delete the contacts permanently, select Remove them from my list permanently.
- If you want to mark the contacts as unsubscribed, but keep the contact’s details, select Mark them as unsubscribed in my list.
- Click Next.
- A screen displays with a report of the results. You can use this screen to delete more contacts from the list.
