Managing User Accounts
Use the following sections to create, manage and delete your user accounts:
Viewing and Managing User Accounts
To view and manage user accounts, click the Users & Groups in the toolbar, then select View User Accounts.
The User Accounts screen displays.
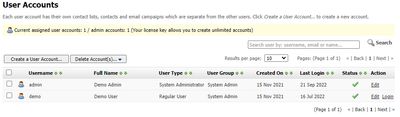
User Accounts
| Search | Use this to search user(s) by username, email address or name. Enter your search term in the text field and click the Search button. |
| Create a User Account | Click this to create a new user account. The screen that displays is the same as the Users & Groups > Create a User Account screen. |
| Delete Accounts | Use this drop-down menu to choose an option of deleting user accounts. |
| Select a box belonging to a user before choosing an option to delete user accounts. Select the box at the top of the column to select all user accounts. | |
| Username | This displays the username(s) created for Interspire Email Marketer account. |
| Full Name | This is the full name of the user. |
| User Type | This displays the user type. For every group, at least one System Administrator is required, the rest are referred to as Regular User. |
| User Group | This diplays the group where the user belongs. |
| Created on | This is the date that the user account was created. |
| Last Login | This displays the date to which the user last logged in to Interspire Email Marketer. |
| Status | This displays the status of the user. A tick ( |
| Action | - Click Edit to edit an existing user account and configure its settings. (See Creating a User Account)) for more details. If you were given access, clicking Login could aumatically log you in to Interspire using other user’s account. |
You can also view, edit and delete user accounts.
Creating and Editing User Accounts
Take the following steps to create a User Account:
- Click the Users & Groups in the toolbar, then select Create a User Account.
To edit an existing user account, go to Users & Groups > View User Accounts screen and click the user account’s Edit icon. - The Create User or Edit a User Account screen displays at the User Settings tab. Configure the settings in this screen (see User Settings).
- When you have finished configuring the User settings screen, click the Advanced User Settings tab (see Advanced User Settings)
- When you have finished configuring the Advanced User Settings screen, click the Email settings tab (see Email settings).
- When you have finished configuring the Email settings screen, click the Admin Notifications tab (see Admin Notifications).
- When you have configured the new user account or edited an existing user account, click Save to finish setting up the account. Alternatively, click Cancel to return to the User Accounts screen without saving your changes.
User Settings
The User Settings screen allows you to control a user account’s personal details (username, user group, password, email address, time zone, etc.).
Settings: User Settings
| Username | Enter the name you want to give to this user account (required). |
| User Group | Choose a user group in the drop-down menu or click the Create a user group link to create a new group. See Creating and Editing User Group for more information. |
| Full name | Enter the user’s full name. |
| Email address | Enter the user’s email address (required). If the user requests the account password, it is sent to this address. |
| User timezone | Select the time zone in which the user is located (required). Time‐related reports and statistics viewed by the viewer are converted to this time zone automatically. |
| New Password | Enter the password for this user account (required) Note: Password should be at least 8 characters in length and should include one upper case letter, one number, and one special character. |
| Confirm New Password | Re‐enter the new Password (required). |
| Send Password Reset | Select this to receive a password reset via email. |
Advanced User Settings
The Advanced User Settings screen allows you to control a user account’s setting such as:
- Whether a user is allowed to use the XML API.
- Whether the account is active, and may be used to send emails.
- Whether the user may edit account settings.
- Whether the user sees knowledge base links.
- Whether the user may use the HTML editor (and use it to produce XHTML output).
Settings: Advanced User Settings
| Enable the XML API | Select this if you want to allow the user to create lists, templates, newsletters, search for contacts and so on using the XML API. The following will display once this option is selected: XML Path: This is the path to the file where all XML API requests should be sent. XML Username: Enter the username used in the XML API requests. XML Token: This serves as an authentication. Absence of this or setting it incorrectly will result to denied request. Click the Regenerate XML API Token link to generate the authenication XML Token. |
| Active | Select this if the user may log in and use the account. Deselect this restrict user to log into the account, this can be used to temporarily suspend access of a particular user. Note: Inactive user(s) will still exist in the system. |
| Edit own settings | Select this if the user may edit the account settings. Deselect this if the user may not edit account settings. |
| Enable Built-in Helps | Select this if you want the user to access the help links to knowledge base and see email marketing or general tips that display at the top of the screen. If you do not want the user of this account to see tips, deselect this option. |
| Use the WYSIWYG Editor | Select this if the user may use the HTML WYSIWYG (What You See Is What You Get) editor for creating and editing Email Campaigns, Templates and Autoresponders. |
| Event Types | Enter the event types that can be used when logging an event for a contact. Listing should be entered per line. |
Email Settings
Use the Email settings screen to configure each user account’s SMTP (Simple Mail Transfer Protocol) settings. Take the following steps:
Set up this user account’s mail server settings:
- Select Use my default SMTP server to have this account use Interspire Email Marketer server’s default settings.
- If you want to configure an SMTP server for this account alone, select Let me specify my own SMTP server details. The following screen displays.
Specify the SMTP hostname (required).
If your SMTP server requires a username and password for authentication, enter them in the fields SMTP username and SMTP password fields.
If your SMTP server uses a non‐standard port number, enter it in the SMTP port field (the standard SMTP port number is 25).
To ensure that the SMTP settings are functioning correctly, enter an email address in the Test SMTP settings field and click Test SMTP settings to send an email to the specified address.
In the Footer Settings section, enter the footers:
- HTML Footer - Texts entered here will be displayed to the end of every HTML-based email that client sends.
- Text Footer - Texts entered here will be displayed to the end of every text-based email that client sends.
Admin Notifications
Use the Admin Notifications screen to configure each user account’s activity via notification emails. Take the following steps:
- Enter the email address or addresses you want the admin notification emails to be sent. To use more than one email address, separate them with commas, such as:
[email protected], [email protected]
- Tick the Notify of Large Send? box if you would like to receive notifications when the user sends an email campaign to a large list of contacts.
Enter the maximum number of emails the user could send. If the user sends more than the number you have specified, you will be notified and the user will receive an automated email with the following details:
User Fullname
Title of the email campaign sent
Subject line of the email campaign sent
Total number of contacts the email campaign was sent to
Tick the Notify of Large Import? box if you would like to receive notifications when the user imports a large list of contacts.
Enter the maximum number of contacts the user could import. If the user imports more than the number you have specified, you will be notified and the user will receive an automated email with the following details:
- User Fullname
- Name of the list where the contacts were imported
- Total number of contacts imported
Deleting User Accounts
Take the following steps to remove a user account from Interspire Email Marketer.
- Click the Users & Groups in the toolbar, then select View User Accounts.
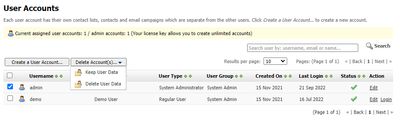
- Select the checkbox to the left of the account’s Username and click the Delete Account(s) drop-down menu. Choose an option of deleting the username:
- Keep User Data - Delete selected user account(s), but keep all the data owned by the account.
- Delete User Data - Delete selected user account(s) along with all the data owned by the account.