Templates
This chapter discusses how to use the Templates menu in the toolbar.
The Templates Menu
Templates Overview
Templates control the look of your email. They specify which fonts and text colors to use, the background colors and images to display, and the size and shape of the text areas on the user’s screen.
How Templates Work
Templates use HTML (HyperText Markup Language) to define your email’s aesthetics. The user’s email client reads this information and displays the email accordingly. This gives your email the same design flexibility found in HTML web design.
Note: If in doubt, it is strongly advised that you configure email templates to send both HTML and plain text elements (multipart). Some email clients cannot display HTML, and some users turn HTML display off, so it is important to transmit a plain text element as well.
You can assign templates to new email campaigns, or to autoresponders.
Advantages of Templates
Using templates to coordinate your email campaigns confers two main advantages. First, your email is instantly recognizable. You can use templates to define or extend corporate branding by presenting the user with your company’s color scheme, logo and associated imagery. Second, your email is consistent. When you use a template for your email campaigns over a period of time, you know that each email you send is based on the same design, and will convey the same message. This is particularly useful when multiple people may be sending out email campaigns from your company.
Built‐in and Custom Templates
Interspire Email Marketer includes a huge variety of built‐in templates, ready for you to use out of the box. They have been designed and tested with interoperability in mind, so they will display correctly in all common HTML email clients.
You can also create your own custom email templates. Either use the included WYSIWYG (What You See Is What You Get) editor, or upload an HTML file from your local computer or a remote URL as the basis for the template.
Testing Your Template
Like Internet browsers, email clients often display email in different ways. What looks correct in one client can look incorrect in another. When you create your own template, use the email validation tool (see Validating an Email) to check that the template displays correctly in a variety of common email clients.
Managing Custom Email Templates
Once you have created a custom email template (see Creating and Editing Custom Email Templates), you can:
- Delete: remove the template from Interspire Email Marketer. The template cannot be retrieved.
- Activate: allow the template to be used for a new email campaign or autoresponder.
- Deactivate: prevent the template from being used for a new email campaign or autoresponder.
- Make Global: allow all users to use the template, regardless of their privileges.
- Remove From Global: allow only certain users to use the template. Configure user template privileges in the User Account > Create User > User Permissions screen for each user.
You can also view, edit, or copy a template.
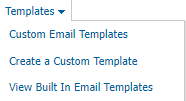
To manage a custom email template you already created, click Templates in the toolbar, then Custom email templates.
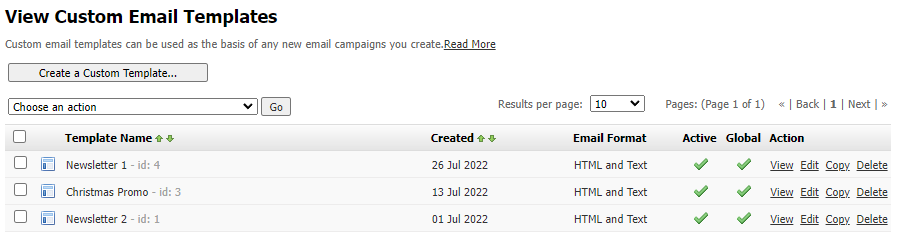
Templates: Custom Email Templates
Templates: Custom Email Templates
| Create a Custom Template | Click this to go to the Create a Custom Email Template screen. See Creating and Editing Custom Email Templates. |
| Choose an action | Select one or more custom templates, select an option from the list and click Go to perform the selected action. |
| Select a box belonging to a template before choosing an option from the Choose an action list. Select the box at the top of the column to select all custom templates. | |
| Template Name | This displays the name you gave to the template. Click Edit to change the name. An identification (id) number displays next to the name, indicating the order in which the templates were created. |
| Created | This displays the date you created the template. |
| Email Format | - Text displays if emails using this template are sent in plain text only. - HTML displays if emails using this template are sent in HTML only. - HTML and Text displays if emails using this template are sent in multipart form. Note: Multipart emails have both an HTML element and a plain text element. Plain text displays if a user’s email client cannot display HTML. |
| Active | A tick ( A cross ( |
| Global | A tick ( A cross ( |
| Action | - Click View to see a full‐screen version of the template. - Click Edit to update the template. The screens that display are similar to the Create a Custom Email Template screens (see Creating and Editing Custom Email Templates). - Click Copy to create a new copy of the template. The new template displays, with “Copy of” appended to the original name, and the id incremented to the next available number. - Click Delete to remove the template from Interspire Email Marketer. |
Creating and Editing Custom Email Templates
Interspire Email Marketer allows you to create custom email templates using the built‐in editors. You can build a template from scratch, edit an existing built‐in template, or base your template on an HTML file you upload from your computer or a remote URL.
Note: If you want to create a new template based on a custom template you created previously, use the Templates > Custom email templates screen to copy the template, then edit the new template. See Managing Custom Email Templates.
Custom Email Template
Take the following steps to create a custom email template:
- Click Templates in the toolbar and select Create a custom template.
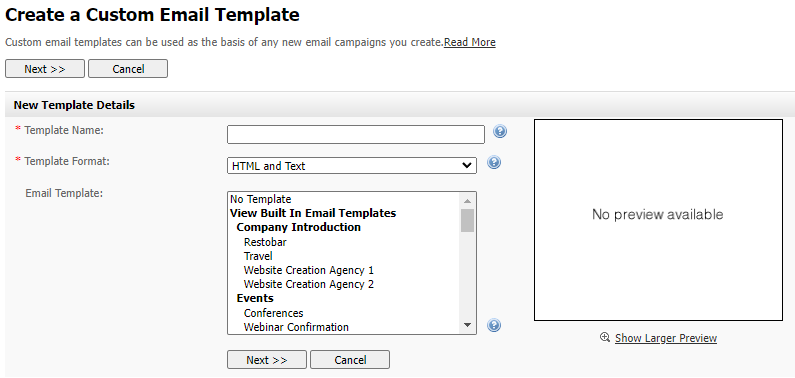
Templates: Create a Custom Template
- Enter a new Template Name.
- Select the type of template you want to create.
- Select HTML and Text if you want emails you send using this template to be sent with both HTML and plain text elements (multipart). Email clients that can display HTML messages use the HTML element, and clients that cannot display HTML use the plain text element.
- Select Text if you want emails you send using this template to be sent in plain text only.
- Select HTML if you want emails you send using this template to be sent in HTML only. If you select this option, your emails will not display in email clients that cannot display HTML messages.
- If you want to base this email template on an existing template, select the template in the Email template list. A preview of the template displays. If you do not want to base this email template on an existing template, select No template in the Email template list.
- Click Next.
Note: If you selected Text only in the previous page, the HTML Content section in this page does not display. Likewise, if you selected HTML only, the Text Content section in this page does not display.
Note: The editor that will display on the screen will depend on the editor that have been configured under your user accont. See Advanced User Settings for more information.
- Customize the HTML template using the editor. See HTML Editor for more information.
- Customize the text template using the editor. See Text Editor for more information.
- Check that your template displays correctly in a variety of common email clients. Click View your email in different email programs. The Email Validation screen displays in a new window (see Validating an Email). When you have finished, close the window.
- Configure the Miscellaneous options
- Select Yes, this template is active if you want the template to be available for use once you have saved it. Otherwise, deselect this option. You can activate the template later.
- Select Yes, this template is global if you want the template to be available to all users. If you want to restrict the template to certain users, deselect this option. You can configure individual user’s privileges in the User Account > Create User > User Permissions screen.
- Finish the template.
- Click Save to save the new template and remain in this screen to make further changes.
- Click Save and exit to save the new template and go to the View Custom Templates screen (see Managing Custom Email Templates).
- Click Cancel to return to the View Custom Templates screen without saving the template. Any changes you made are lost.
Editing a Custom Template
Take the following steps to edit an existing template:
- Click Templates in the toolbar and select Custom email templates. Click Edit next to the template you want to edit. The Update Template screen displays.
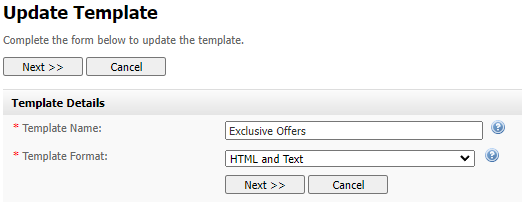
Custom Email Templates: Update Template
- Configure the template details.
- If you want to change the Template Name, enter the new name.
- If you want to change the Template Format, select the new format.
- Click Next. The editor screen will be displayed.
Viewing Built‐In Email Templates
Interspire Email Marketer has a wide variety of built‐in email templates designed for different uses.
To view the built‐in templates, click Templates in the toolbar and select View built‐in templates.
- To see a template in full‐screen mode, click Show larger preview or click the template’s thumbnail icon.
- To use a template in an email campaign, click Email campaigns>Create email campaign and select the template.
- To modify a template for later use in an email campaign, create a new custom template based on the built‐in template. See Creating and Editing Custom Email Templates.
Refreshed Template Library v8.7.5
Version 8.7.5 replaces the legacy built-in templates with 30 modern email templates. They are organized into the following categories:
| Category | Description |
|---|---|
| Announcement | Event announcements and company updates |
| Blank | Minimal starting point for custom designs |
| Content | Article and content-focused layouts |
| E-commerce | Product catalogs, cart reminders, shipping updates, and product features |
| Minimal | Clean, simple designs with minimal styling |
| Newsletter | Multi-section newsletter layouts |
| Promotional | Coupons, product showcases, seasonal sales, and multi-product grids |
| Transactional | Order confirmations, receipts, and account notifications |
In addition, the BuilderJS editor includes 18 drag-and-drop starter templates covering common use cases such as welcome emails, product promotions, event invitations, and thank-you messages.